Exam 3 OPP
Study these flashcardsFree · spaced repetition · iPhone, Android, Mac & web
All cards
1
what joins at the bregma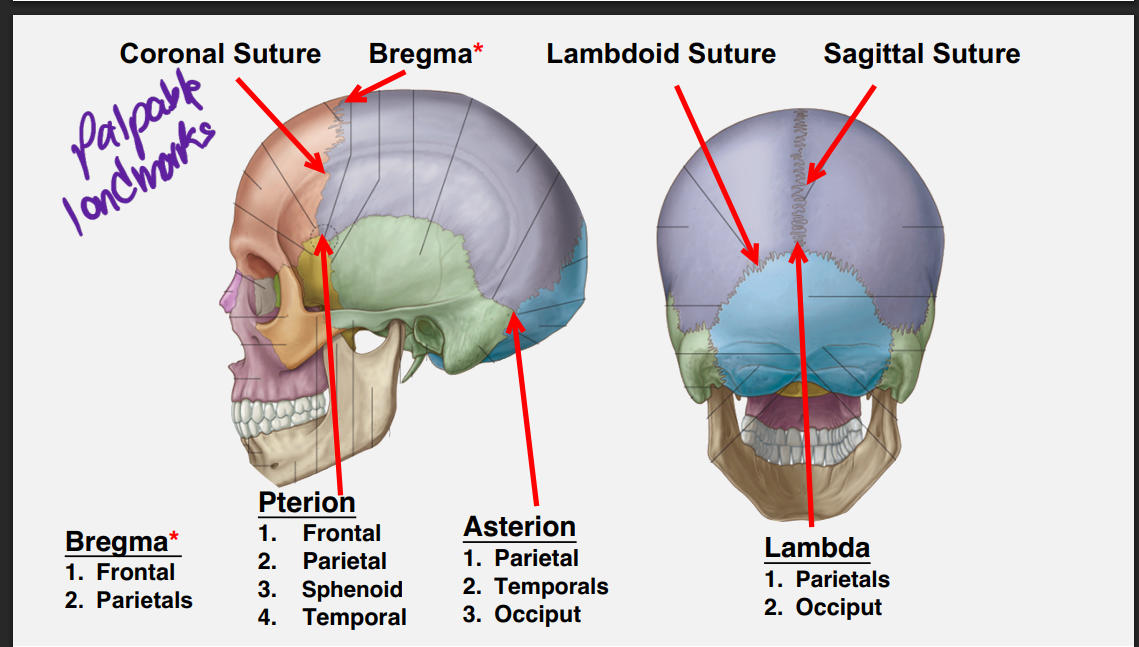
frontak and parietal bone
2
what joins at the pterion?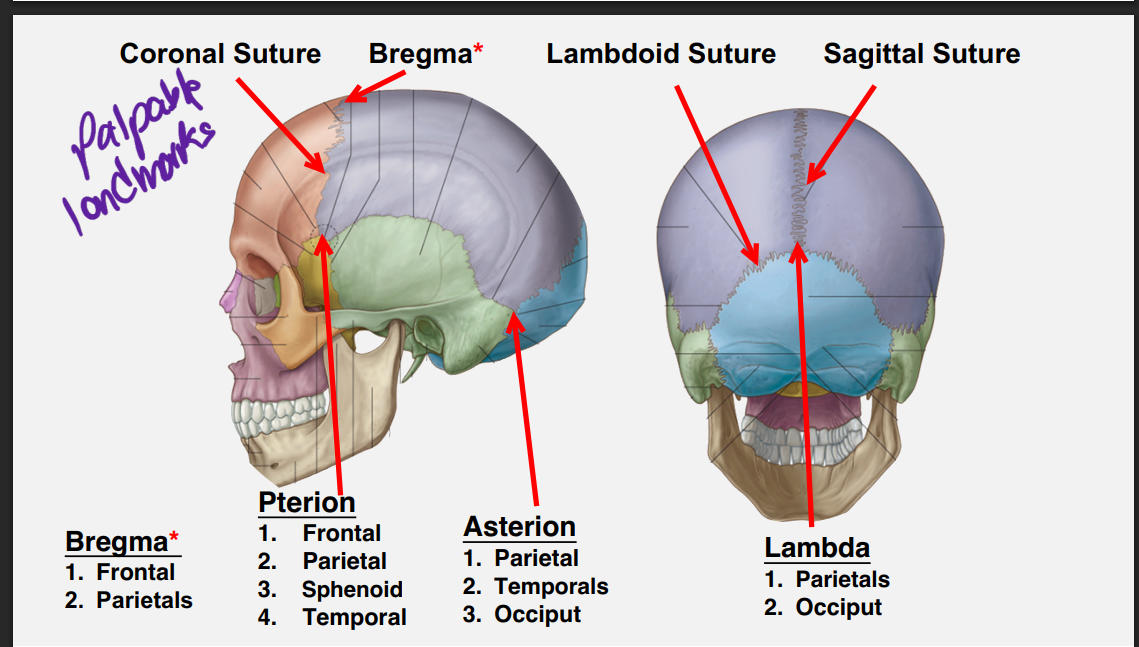
frotal, parietal, sphenoid, and temporal bones
3
what joins at the asterion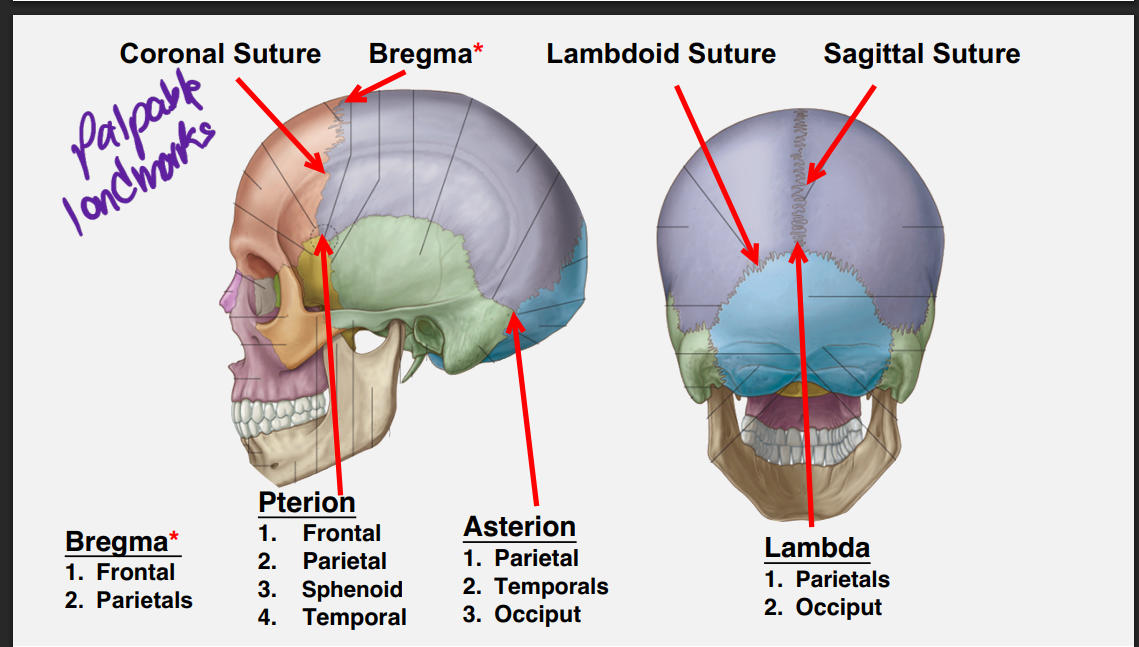
paretl, temporals, occiputal bones
4
what joins at the lambda?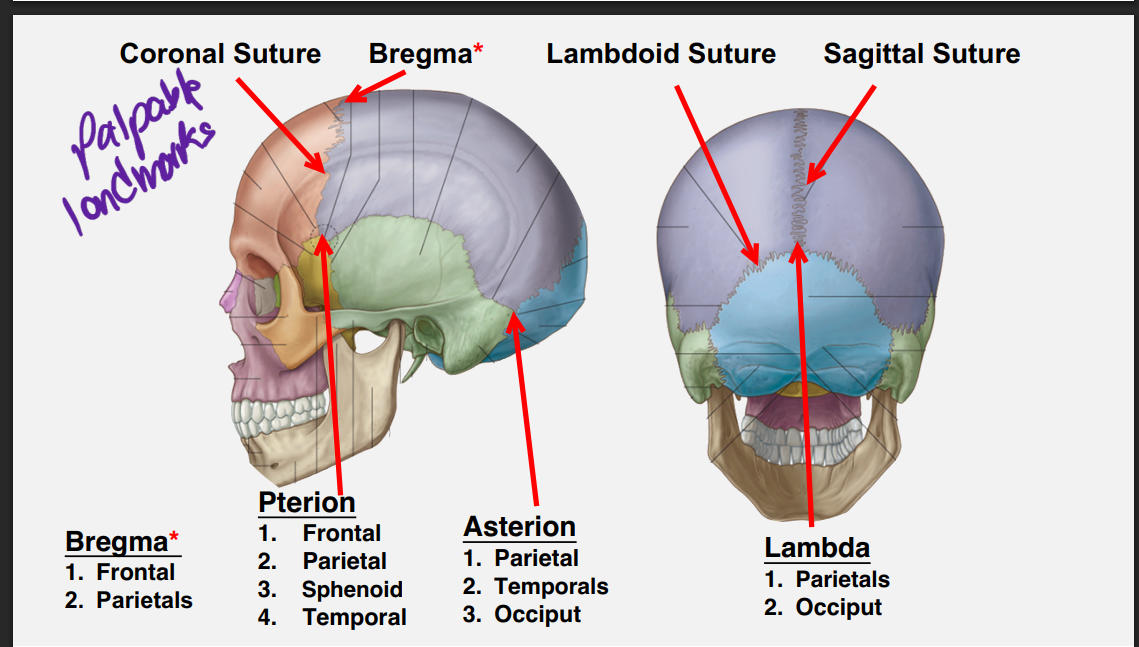
parietal and occipital
5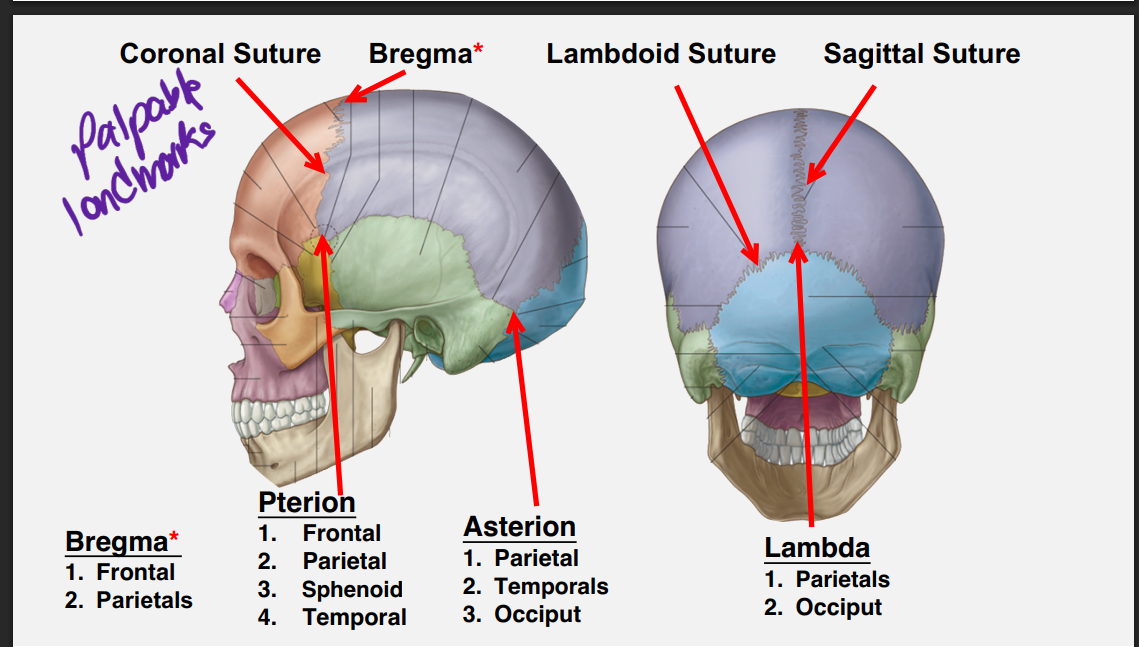
Image occlusion: name the hidden labels
6
Image occlusion: name the hidden labels
7
Image occlusion: name the hidden labels
8
Image occlusion: name the hidden labels
9
Image occlusion: name the hidden labels
10
Image occlusion: name the hidden labels
11
Image occlusion: name the hidden labels
12
HEENT Lymphatic techniques in order
1. Any associated thoracic/costal and/or upper lumbar somatic dysfunction
2. Release thoracic inlet/outlet myofascial restrictions (learned
previously)
3. Anterior cervical arches
4. Cervical chain drainage
5. Submandibular release
6. Mandibular drainage (Galbreath technique)
7. Auricular drainage
8. Alternating nasal pressure/frontonasal distraction
9. Trigeminal stimulation
10.Fronto (facial) temporomandibular drainage: effleurage
11.Suboccipital release (learned previously) may be performed after Step
2
2. Release thoracic inlet/outlet myofascial restrictions (learned
previously)
3. Anterior cervical arches
4. Cervical chain drainage
5. Submandibular release
6. Mandibular drainage (Galbreath technique)
7. Auricular drainage
8. Alternating nasal pressure/frontonasal distraction
9. Trigeminal stimulation
10.Fronto (facial) temporomandibular drainage: effleurage
11.Suboccipital release (learned previously) may be performed after Step
2
13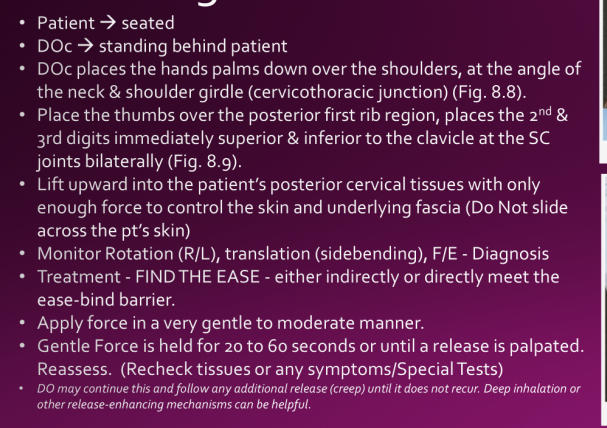
Thoracic inlet outlet stearing wheel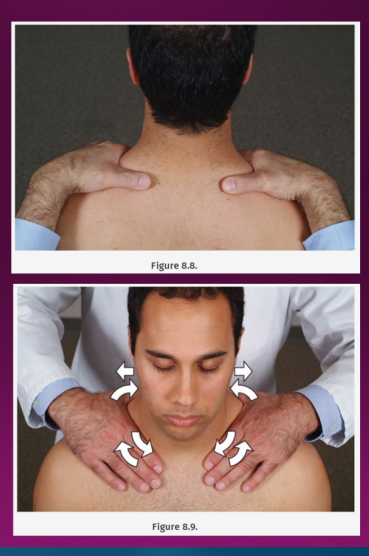
14
indications of mandivular drainage X2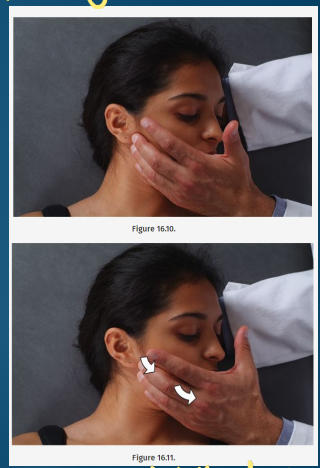
Dysfunction or lymphatic congestion in the ENT or
submandibular region
Eustachian tube dysfunction
submandibular region
Eustachian tube dysfunction
15
contraindications of mandibular drainage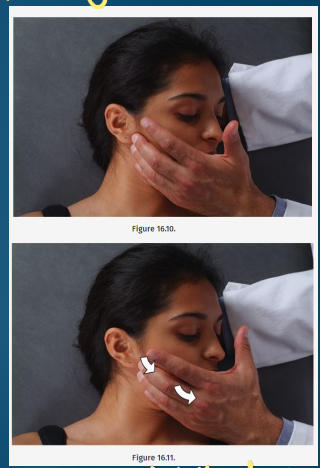
TMJ dysfunction
-something in their mouth
-something in their mouth
16
*Ask if patient has anything in their mouth (know if loose objects as well)
*Inform patient that they may experience drainage down the back of their throat
Avoid treating over TMJ disorder
Patient: Supine, head turned slightly toward DOc
DOc: Seated at pt’s side (opposite of side to be treated), near the head of the
table
Technique
Have patient relax jaw open
Stabilize head contralaterally with cephalad hand
Engage ipsilateral mandible with third, fourth and fifth fingers of caudad hand along
posterior ramus of the mandible and hypothenar eminence along the body of the
mandible
Gently move inferiorly, medially, and slightly anteriorly
May maintain this position or may use a gentle milking motion until release felt (slow
rhythmic motion for 30 seconds to 2 minutes)
Reassess: symptoms improved, reevaluate tissue texture, repeat otoscope exam
*Inform patient that they may experience drainage down the back of their throat
Avoid treating over TMJ disorder
Patient: Supine, head turned slightly toward DOc
DOc: Seated at pt’s side (opposite of side to be treated), near the head of the
table
Technique
Have patient relax jaw open
Stabilize head contralaterally with cephalad hand
Engage ipsilateral mandible with third, fourth and fifth fingers of caudad hand along
posterior ramus of the mandible and hypothenar eminence along the body of the
mandible
Gently move inferiorly, medially, and slightly anteriorly
May maintain this position or may use a gentle milking motion until release felt (slow
rhythmic motion for 30 seconds to 2 minutes)
Reassess: symptoms improved, reevaluate tissue texture, repeat otoscope exam
mandibular drainage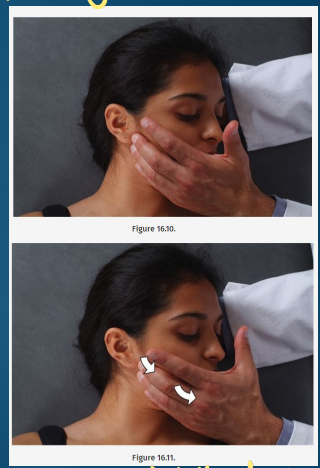
17
indications of auricular drainage technique (x3)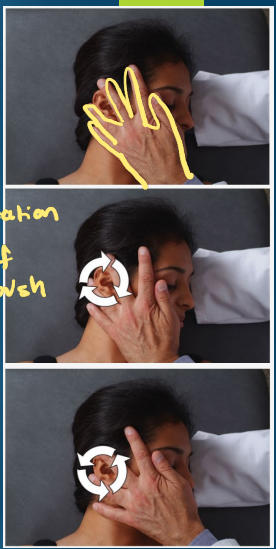
Any dysfunction or lymphatic congestion in the ear
region
Otitis media
Otitis externa
region
Otitis media
Otitis externa
18
contraindications of auricular drainage technique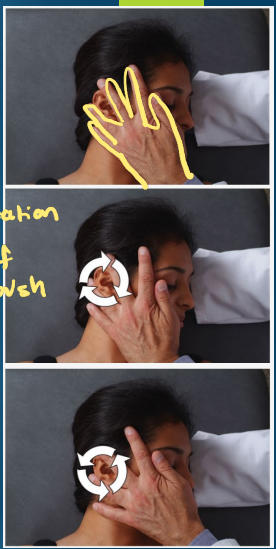
TMJ dysfunction
-something in mouth
-something in mouth
19
*Ask if patient has anything in their mouth (know if loose objects as well)
*Inform patient that they may experience drainage down the back of their
throat
Avoid treating over TMJ disorder
Patient: Supine, head turned slightly toward DOc
DOc: Seated at patient’s side (opposite of side to be treated), near the
head of the table
Technique
Stabilize contralaterally with cephalad hand
Place caudad hand with fingers pointing cephalad and the ear between the
3rd and 4th fingers
Contact and engage anterior and posterior to auricle and gently massage in
rotary motion – clockwise, then counterclockwise (do not drag skin)
Duration: 30 seconds to 2 minutes
Reassess: symptoms improved, reevaluate tissue texture, repeat otoscope
exam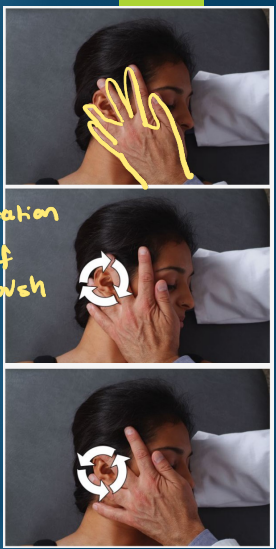
*Inform patient that they may experience drainage down the back of their
throat
Avoid treating over TMJ disorder
Patient: Supine, head turned slightly toward DOc
DOc: Seated at patient’s side (opposite of side to be treated), near the
head of the table
Technique
Stabilize contralaterally with cephalad hand
Place caudad hand with fingers pointing cephalad and the ear between the
3rd and 4th fingers
Contact and engage anterior and posterior to auricle and gently massage in
rotary motion – clockwise, then counterclockwise (do not drag skin)
Duration: 30 seconds to 2 minutes
Reassess: symptoms improved, reevaluate tissue texture, repeat otoscope
exam
auricular drainage technique
20
indications of trigeminal stimulation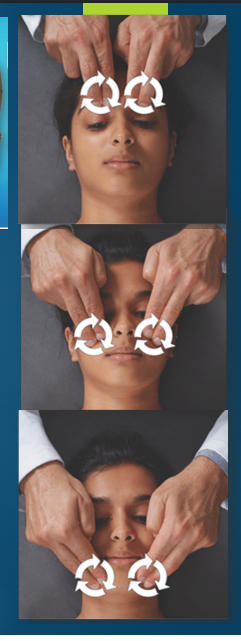
Any dysfunction or lymphatic congestion
in the ENT region affecting or exacerbated
by CN V
in the ENT region affecting or exacerbated
by CN V
21
*Ask if patient has anything in their mouth
(know if loose objects as well)
*Inform patient that they may experience drainage down the back
of their throat
Patient: Supine
DOc: Seated at the head of the table
Technique:
Locate and palpate supraorbital foramina bilaterally
With pad of middle finger of each hand, engage area you are treating
with firm rotary motion
Repeat treatment at infraorbital and mental foramina
Duration: 30 seconds to 2 minutes at each location
Reassess: symptoms improved, reassess sinuses, tissue texture
change palpated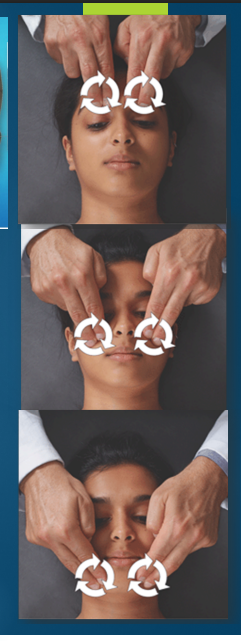
(know if loose objects as well)
*Inform patient that they may experience drainage down the back
of their throat
Patient: Supine
DOc: Seated at the head of the table
Technique:
Locate and palpate supraorbital foramina bilaterally
With pad of middle finger of each hand, engage area you are treating
with firm rotary motion
Repeat treatment at infraorbital and mental foramina
Duration: 30 seconds to 2 minutes at each location
Reassess: symptoms improved, reassess sinuses, tissue texture
change palpated
trigeminal stimulation
22
indication of maxillary drainage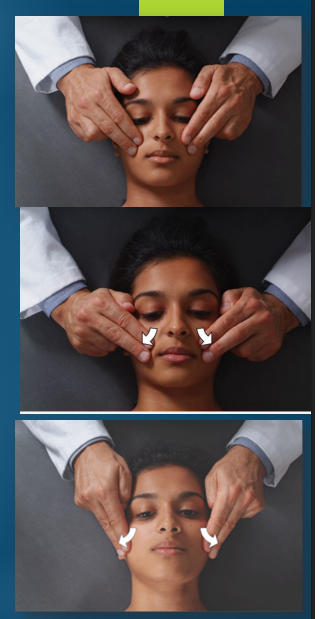
Any dysfunction or
lymphatic congestion in
the ENT region especially
the maxillary sinuses
lymphatic congestion in
the ENT region especially
the maxillary sinuses
23
*Ask if patient has anything in their mouth (know if loose objects as
well)
*Inform patient that they may experience drainage down the back of
their throat
Patient: Supine
DOc: Seated at the head of the table
Technique:
Engage area to bones overlying the sinuses being treated
Maintain firm pressure during treatment – medial to lateral
motion as described
Duration: 30 seconds to 2 minutes
Reassess: symptoms improved, tissue texture change palpated,
reassess sinus exam, pharynx exam with postnasal drainage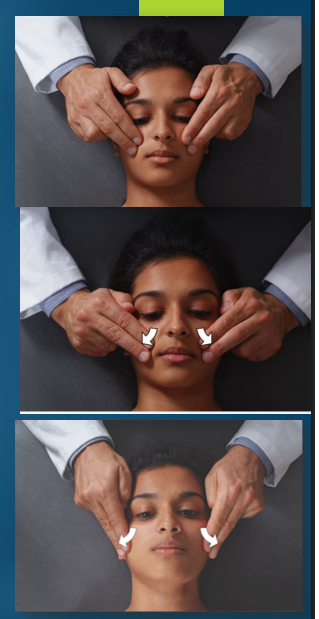
well)
*Inform patient that they may experience drainage down the back of
their throat
Patient: Supine
DOc: Seated at the head of the table
Technique:
Engage area to bones overlying the sinuses being treated
Maintain firm pressure during treatment – medial to lateral
motion as described
Duration: 30 seconds to 2 minutes
Reassess: symptoms improved, tissue texture change palpated,
reassess sinus exam, pharynx exam with postnasal drainage
maxillary drainage
24
indications of frontal drainage?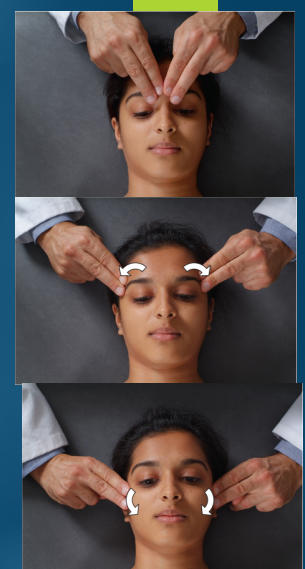
Any dysfunction or
lymphatic congestion in
the ENT region, especially
those affecting the frontal
through mandibular
regions or in tension
headache.
lymphatic congestion in
the ENT region, especially
those affecting the frontal
through mandibular
regions or in tension
headache.
25
*Ask if patient has anything in their mouth (know if loose objects as
well)
*Inform patient that they may experience drainage down the back of
their throat
Patient: Supine
DOc: Seated at the head of the table
Technique:
Engage area to bones overlying the sinuses being treated
2nd fingertips (may include 3rd fingers) immediately above and
medial to the eyebrows
Maintain firm pressure during treatment – medial to lateral
motion as described, parallel to supraorbital ridge to pterion,
continue inferior toward TMJ to mandible
Duration: 30 seconds to 2 minutes
Reassess: symptoms improved, tissue texture change palpated,
reassess sinus exam, pharynx exam with postnasal drainage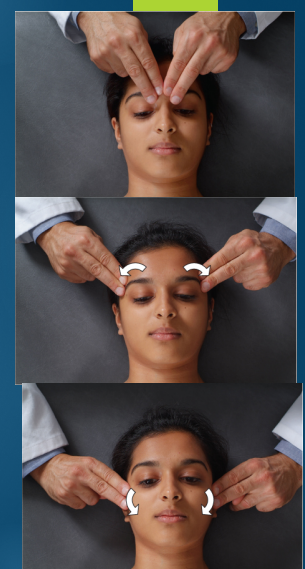
well)
*Inform patient that they may experience drainage down the back of
their throat
Patient: Supine
DOc: Seated at the head of the table
Technique:
Engage area to bones overlying the sinuses being treated
2nd fingertips (may include 3rd fingers) immediately above and
medial to the eyebrows
Maintain firm pressure during treatment – medial to lateral
motion as described, parallel to supraorbital ridge to pterion,
continue inferior toward TMJ to mandible
Duration: 30 seconds to 2 minutes
Reassess: symptoms improved, tissue texture change palpated,
reassess sinus exam, pharynx exam with postnasal drainage
frontal effleurage
26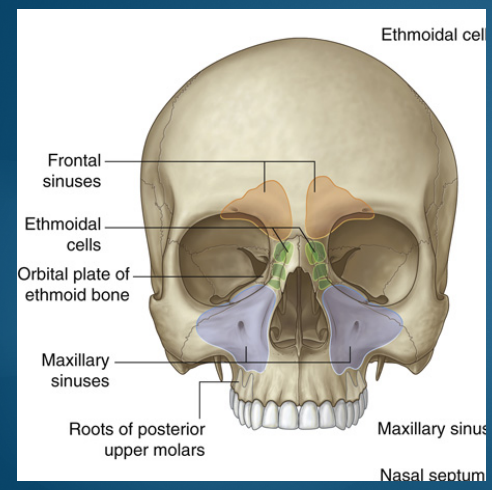
Image occlusion: name the hidden labels
27
Image occlusion: name the hidden labels
28
Image occlusion: name the hidden labels
29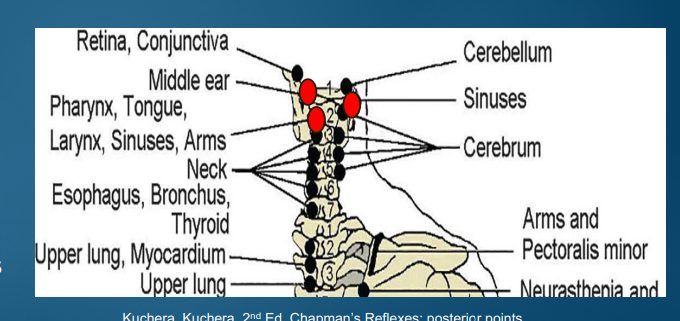
Image occlusion: name the hidden labels
30
Image occlusion: name the hidden labels
31
Image occlusion: name the hidden labels
32
Image occlusion: name the hidden labels
33
Image occlusion: name the hidden labels
34
Image occlusion: name the hidden labels
35
Image occlusion: name the hidden labels
36
Image occlusion: name the hidden labels
37
Image occlusion: name the hidden labels
38
Image occlusion: name the hidden labels
39
Image occlusion: name the hidden labels
40
structures passing through the superior orbital fissure
CN III, IV, ophthalmic division of V1, CN VI, ophthalmic veins
41
5 cranial concept principles
1. Inherent motility of the brain
and spinal cord
2. Fluctuation of the
cerebrospinal fluid
3. Mobility of the intracranial and intraspinal membranes
4. Articular mobility of the cranial bones
5. Involuntary mobility of the
sacrum between the ilia
and spinal cord
2. Fluctuation of the
cerebrospinal fluid
3. Mobility of the intracranial and intraspinal membranes
4. Articular mobility of the cranial bones
5. Involuntary mobility of the
sacrum between the ilia
42
2 phases of cranial rhythmic movement
flexion and extension
43
Articulation between sphenoid and occiput
The Angle of the SBS defines Flexion phase and Extension phase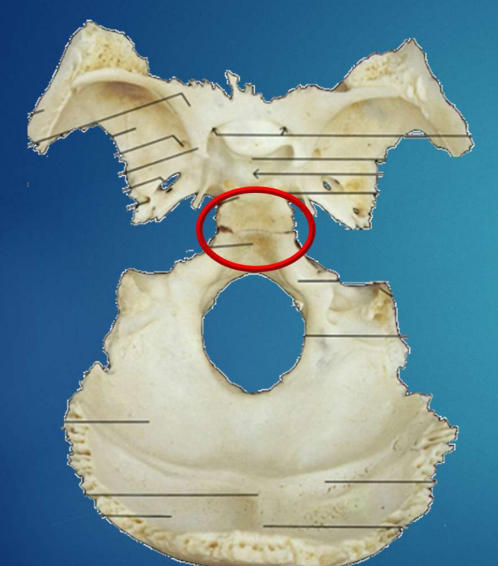
The Angle of the SBS defines Flexion phase and Extension phase
sphenobasilar synchondrosis (SBS)
44
what type of joint is the temporomandobular joint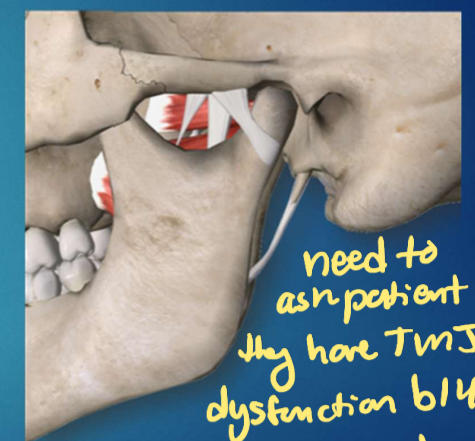
ellipsoid snovial joint
45
tempororomandibular joint motions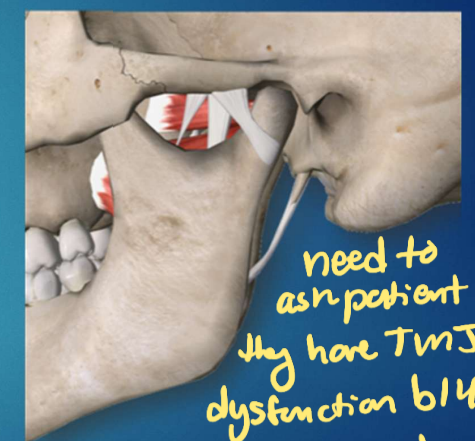
Depression:
Mouth opens
Mandibular head glides anteriorly
Elevation:
Mouth closes
Mandibular head glides posteriorly
Other motions:
Protraction / Retraction
Lateral glide
Mouth opens
Mandibular head glides anteriorly
Elevation:
Mouth closes
Mandibular head glides posteriorly
Other motions:
Protraction / Retraction
Lateral glide
46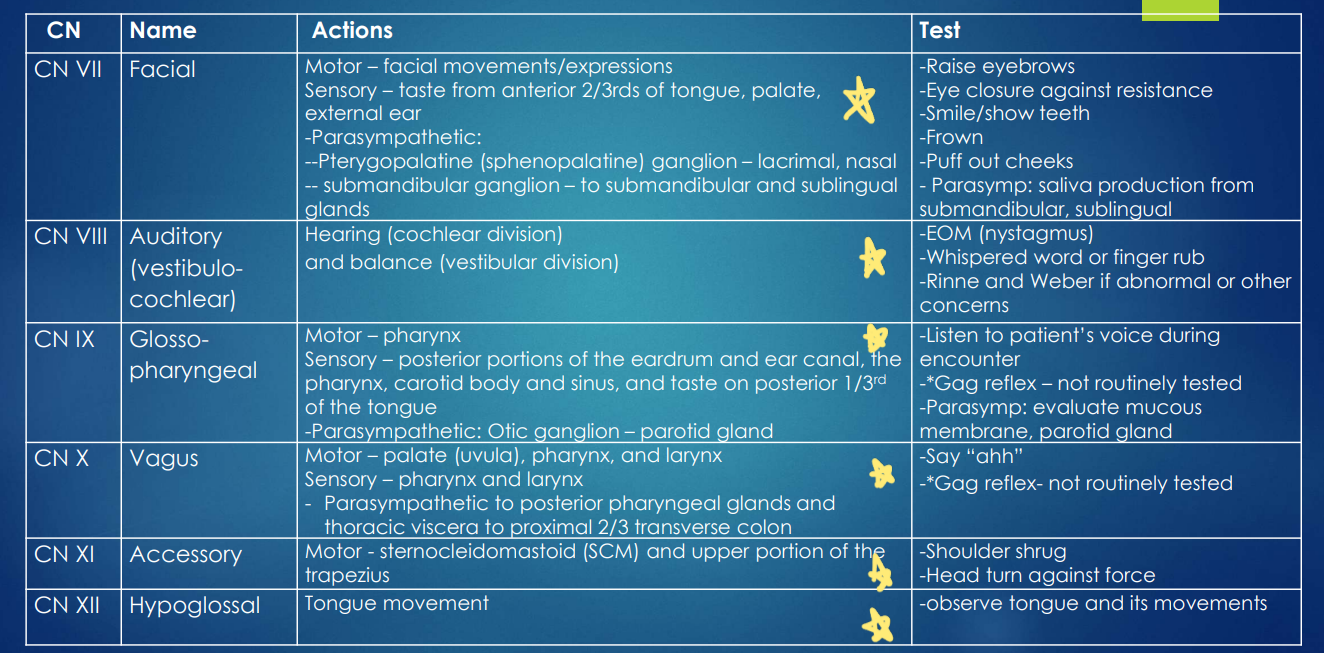
Image occlusion: name the hidden labels
47
Image occlusion: name the hidden labels
48
Image occlusion: name the hidden labels
49
Image occlusion: name the hidden labels
50
Image occlusion: name the hidden labels
51
Image occlusion: name the hidden labels
52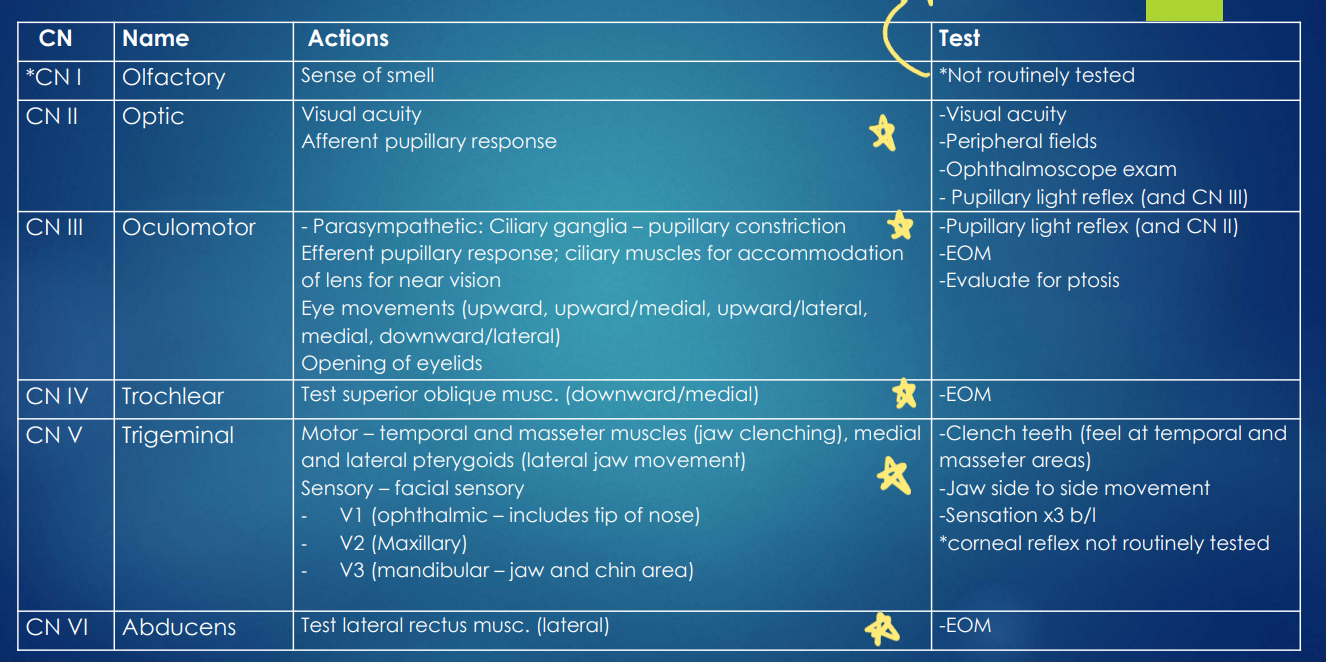
Image occlusion: name the hidden labels
53
Image occlusion: name the hidden labels
54
Image occlusion: name the hidden labels
55
Image occlusion: name the hidden labels
56
Image occlusion: name the hidden labels
57
Image occlusion: name the hidden labels
58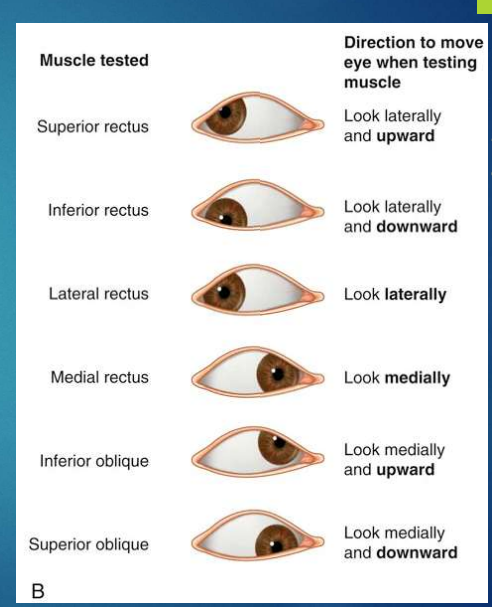
Image occlusion: name the hidden labels
59
Image occlusion: name the hidden labels
60
Image occlusion: name the hidden labels
61
Image occlusion: name the hidden labels
62
Image occlusion: name the hidden labels
63
Image occlusion: name the hidden labels
64
what type of joints are the luschka joints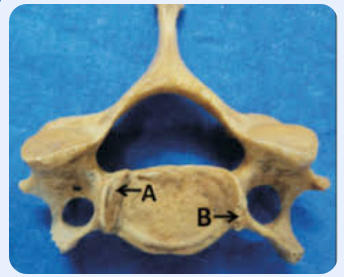
synovial joints
65
fx luschka joints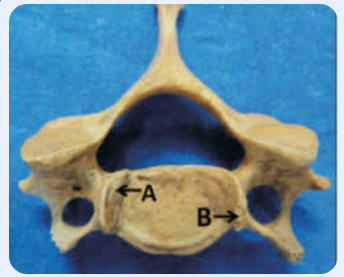
Stabilize cervical spine
o Limit sidebending (aka
lateral flexion) and rotation
o Protect intervertebral discs
from excessive stress
o Limit sidebending (aka
lateral flexion) and rotation
o Protect intervertebral discs
from excessive stress
66
motion patterns of the cervical spine are larfely determined by these joinrs which are independent of doscs, liagemnts, and musculature
facet joints
67
the occiput on C-1 exobts these mechanics
type 1 mechanics (similar)
68
the C1 on C2 are only _______-
rotate; only dysfunction on the rotational component
69
C2-6 exibit motion like these mechanics where sidebending and rptation are always coupled to the same side
type II mexhanics
70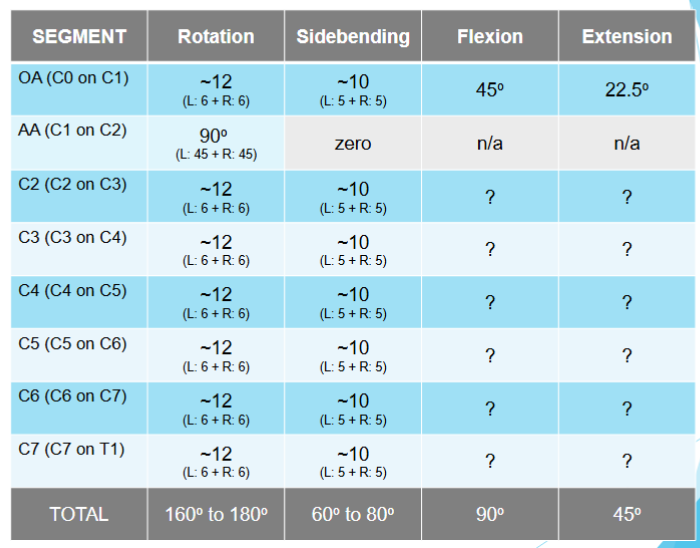
Image occlusion: name the hidden labels
71
Image occlusion: name the hidden labels
72
Image occlusion: name the hidden labels
73
Image occlusion: name the hidden labels
74
Image occlusion: name the hidden labels
75
Image occlusion: name the hidden labels
76
Image occlusion: name the hidden labels
77
Image occlusion: name the hidden labels
78
Image occlusion: name the hidden labels
79
Image occlusion: name the hidden labels
80
Image occlusion: name the hidden labels
81
Image occlusion: name the hidden labels
82
Image occlusion: name the hidden labels
83
Image occlusion: name the hidden labels
84
Image occlusion: name the hidden labels
85
Image occlusion: name the hidden labels
86
Image occlusion: name the hidden labels
87
Image occlusion: name the hidden labels
88
clinicl considerations with the neck
Systemic conditions with ligamentous laxity
Down syndrome
Rheumatoid arthritis
Trauma
Whiplash
Spinal Cord injury
Trunks, Roots, Peripheral Nerve
Atraumatic neuropathies
Posture
Stress
Tense upper back and neck muscles
Headache
Tension
Migraines
TMJ Dysfunction
Sinusitis
SNS innervation
Levator scapulae Dysfunction
Torticollis
Can be primary or secondary
Can be a sign c-spine involvement of certain
systemic conditions
Chapman points
Reflexes
Viscerosomatic
Somatovisceral
Down syndrome
Rheumatoid arthritis
Trauma
Whiplash
Spinal Cord injury
Trunks, Roots, Peripheral Nerve
Atraumatic neuropathies
Posture
Stress
Tense upper back and neck muscles
Headache
Tension
Migraines
TMJ Dysfunction
Sinusitis
SNS innervation
Levator scapulae Dysfunction
Torticollis
Can be primary or secondary
Can be a sign c-spine involvement of certain
systemic conditions
Chapman points
Reflexes
Viscerosomatic
Somatovisceral
89
Chronic systemic inflammatory dz
Classic small peripheral joint involvement can be
coupled with axial (cervical) spine involvemen
Classic small peripheral joint involvement can be
coupled with axial (cervical) spine involvemen
rheumatoid arthritis
90
what join can down syndrom result in instability im (neck joimt)
atlantoaxial joint
91
Patient supine
2. DOc at head of table
3. DOc's finger pads within occipital sulcus
◦ Which is deeper?
◦ The deeper sulcus reflects a relatively posterior occiput on that
side... therefore this is the side to which the occiput is rotated
4. DOc confirms side bending with translation
5. Once back to neutral, DOc assess OA in flexion and
extension
◦ ONLY mobilize the segment in question and ONLY to the degree
of motion expected for that segment
◦ Does the sulcus become shallower in flexion, extension, or
neither?
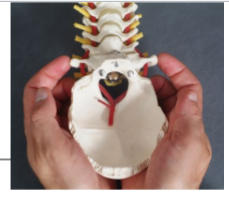
2. DOc at head of table
3. DOc's finger pads within occipital sulcus
◦ Which is deeper?
◦ The deeper sulcus reflects a relatively posterior occiput on that
side... therefore this is the side to which the occiput is rotated
4. DOc confirms side bending with translation
5. Once back to neutral, DOc assess OA in flexion and
extension
◦ ONLY mobilize the segment in question and ONLY to the degree
of motion expected for that segment
◦ Does the sulcus become shallower in flexion, extension, or
neither?
OA diagnosis
92
what does diagnosing the OA test for?
3. Testing rotation
4. Testing/confirming side bending with translation
5. Testing flexion / extensio
4. Testing/confirming side bending with translation
5. Testing flexion / extensio
93
1. Patient supine
2. DOc standing at head of table
3. DOc monitoring above AA to avoid
extension at OA
◦ Index on sulcus, 3rd finger on occiput
◦ If fingers "scissor," then OA is
inappropriately flexing or extending
4. DOc locking out C2-C7 by flexing the
lower cervical spine
5. Once locked out, rotate bilaterally to
determine which side is favored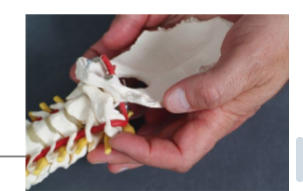
2. DOc standing at head of table
3. DOc monitoring above AA to avoid
extension at OA
◦ Index on sulcus, 3rd finger on occiput
◦ If fingers "scissor," then OA is
inappropriately flexing or extending
4. DOc locking out C2-C7 by flexing the
lower cervical spine
5. Once locked out, rotate bilaterally to
determine which side is favored
diagnosing AA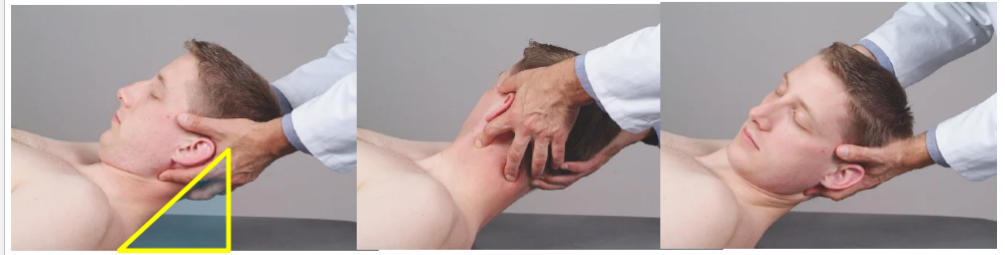
94
1. Patient supine
2. DOc's finger pads on segmental ARTICULAR PILLARS
◦ Which is most posterior?
◦ The relatively posterior articular pillar is the side to which the
segment is rotated.
3. DOc confirms side bending with translation
4. Once back to neutral, DOc assess segment in flexion
and extension
◦ ONLY mobilize the segment in question and ONLY to the
degree of motion expected for that segment
◦ Do the articular pillars become more symmetrical in flexion,
extension, or neither?
◦ If yes, then that is considered the motion of ease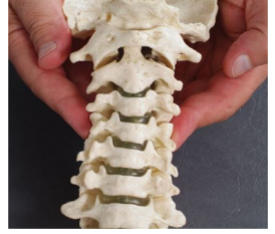
2. DOc's finger pads on segmental ARTICULAR PILLARS
◦ Which is most posterior?
◦ The relatively posterior articular pillar is the side to which the
segment is rotated.
3. DOc confirms side bending with translation
4. Once back to neutral, DOc assess segment in flexion
and extension
◦ ONLY mobilize the segment in question and ONLY to the
degree of motion expected for that segment
◦ Do the articular pillars become more symmetrical in flexion,
extension, or neither?
◦ If yes, then that is considered the motion of ease
diagnosing C2-C7
95
contraindications to cervical linear traction (x3)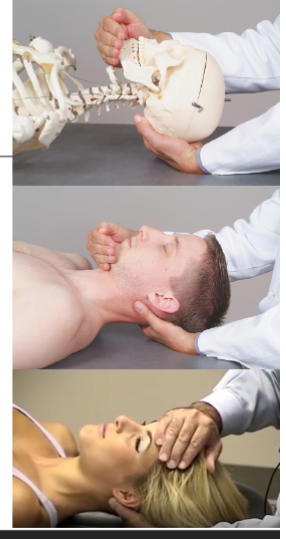
Spinal Stenosis, Acute injuries, Pain or guarding during technique
96
1. Patient - supine
2. DOc is at head of table (Seated or standing)
3. DOc hand positions
◦ One hand cups the base of the skull/occiput with their palm, forearms parallel to table
◦ Second hand – 2 options
◦ Option A – hypothenar eminence at the base of the chin (Do not use of TMJ or
jaw/teeth disorder)
◦ Option B – palm over the patient’s forehead – far above eyebrows not to open their
eyes
4. DOc adds very minimum flexion at OA – chin tilt first and then gently provides
cephalad directed linear traction and hold until release if appreciated (parallel to table
and pt cervical spine)
◦ ~ 10-20 sec at time for total of 30-60 seconds
5. Very slowly release and return pt to neutral
6. Reassess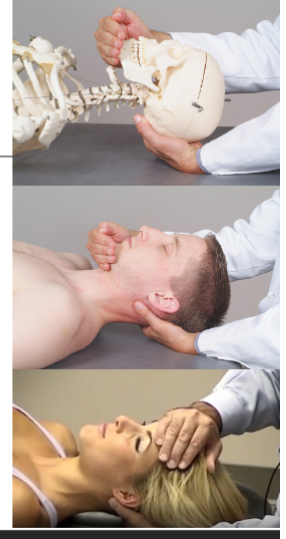
2. DOc is at head of table (Seated or standing)
3. DOc hand positions
◦ One hand cups the base of the skull/occiput with their palm, forearms parallel to table
◦ Second hand – 2 options
◦ Option A – hypothenar eminence at the base of the chin (Do not use of TMJ or
jaw/teeth disorder)
◦ Option B – palm over the patient’s forehead – far above eyebrows not to open their
eyes
4. DOc adds very minimum flexion at OA – chin tilt first and then gently provides
cephalad directed linear traction and hold until release if appreciated (parallel to table
and pt cervical spine)
◦ ~ 10-20 sec at time for total of 30-60 seconds
5. Very slowly release and return pt to neutral
6. Reassess
cervical linear traction
97
indications for cervical linear traction (x2) 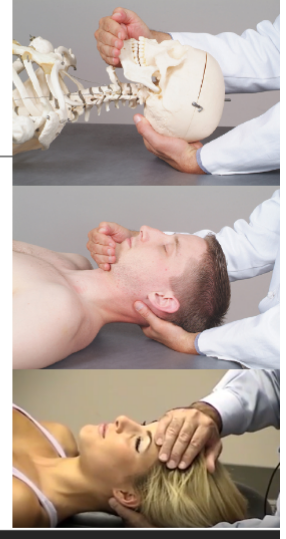
Paravertebral muscle tension/hypertonicity (levator scapulae, trapezius), may be
used with caution with DJD cervical spine
used with caution with DJD cervical spine
98
1. Patient supine
2. DOc – head of the table (Seated or
Standing)
3. DOc places the patient's occiput on their
crossed forearms – starting parallel with
the OMT table
◦ DOc hands are on the contralateral shoulders
4. DOc gently lift forearms away from the
OMT table providing passive (midline)
cervical flexion until feel flexion barrier
5. Hold until a release if appreciated
6. Slowly return to neutral
7. Reasses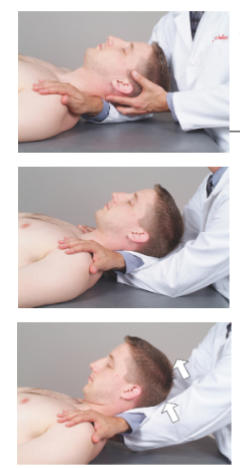
2. DOc – head of the table (Seated or
Standing)
3. DOc places the patient's occiput on their
crossed forearms – starting parallel with
the OMT table
◦ DOc hands are on the contralateral shoulders
4. DOc gently lift forearms away from the
OMT table providing passive (midline)
cervical flexion until feel flexion barrier
5. Hold until a release if appreciated
6. Slowly return to neutral
7. Reasses
cervical bilateral linear stretch
99
indications of cervical bilateral linear stretch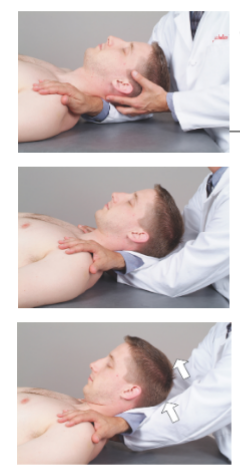
Paravertebral muscle tension/hypertonicity (levator scapulae, trapezius,
etc)
etc)
100
contraindications of cervical bilateral linear stretch (x3)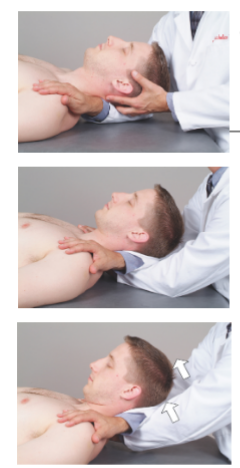
Spinal Stenosis, Acute injuries, Pain or guarding during
technique
Nicholas Atlas, 4th Ed. p. 92 and DiGiovanna 4th Ed , p..86
technique
Nicholas Atlas, 4th Ed. p. 92 and DiGiovanna 4th Ed , p..86
101
1. Patient supine
2. DOc next to patient at side of table
3. DOc's cephalad hand gently on the forehead
4. DOc's caudal hand on the contralateral cervical
paraspinal muscles
◦ Do not cross over midline - posteriorly
◦ Apply perpendicular (lateral-anterior) stretch
◦ Hold until release (up to 20 sec) or kneading fashion
◦ Release forces at that area
◦ Re-apply stretch to next area and then entirety of c-spine
◦ Repeat on other side
◦ DOc must switch to other side of table to complete properly
5. Reassess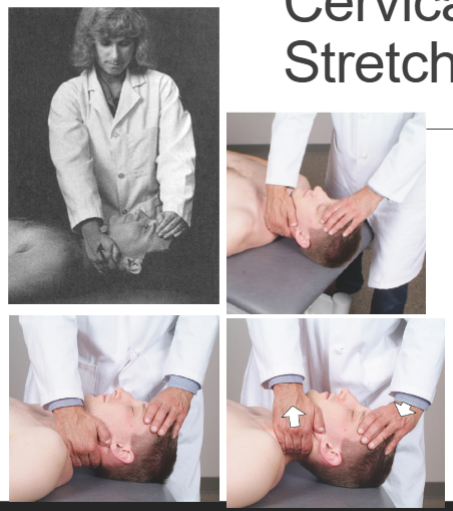
2. DOc next to patient at side of table
3. DOc's cephalad hand gently on the forehead
4. DOc's caudal hand on the contralateral cervical
paraspinal muscles
◦ Do not cross over midline - posteriorly
◦ Apply perpendicular (lateral-anterior) stretch
◦ Hold until release (up to 20 sec) or kneading fashion
◦ Release forces at that area
◦ Re-apply stretch to next area and then entirety of c-spine
◦ Repeat on other side
◦ DOc must switch to other side of table to complete properly
5. Reassess
cervical perpendcular stretch
102
1. Patient supine
2. DOc head of table
3. DOc’s hands B/L in posterior neck with fingertips lateral to
ipsilateral spinous processes and over paravertebral
musculature over articular pillars
4. DOc’s exerts ventral force to engage tissues, and a
longitudinal stretch cephalad cervical paraspinal muscles
◦ Apply parallel (cephalad-anterior) stretch
◦ Hold until release or kneading version
◦ Return to neutral
◦ Re-apply stretch to next area and then entirety of c-spine B/L
◦ Work way up and down c-spine level by level (rhythmic or Hold
technique)
5. Reassess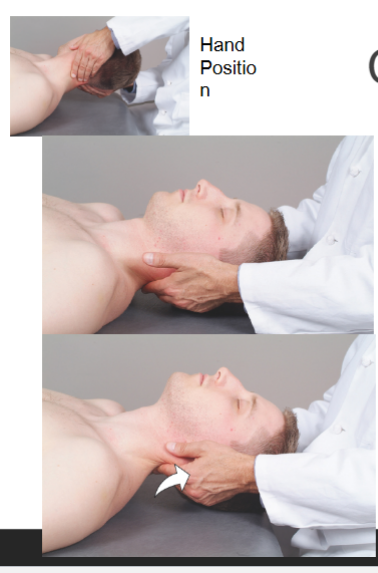
2. DOc head of table
3. DOc’s hands B/L in posterior neck with fingertips lateral to
ipsilateral spinous processes and over paravertebral
musculature over articular pillars
4. DOc’s exerts ventral force to engage tissues, and a
longitudinal stretch cephalad cervical paraspinal muscles
◦ Apply parallel (cephalad-anterior) stretch
◦ Hold until release or kneading version
◦ Return to neutral
◦ Re-apply stretch to next area and then entirety of c-spine B/L
◦ Work way up and down c-spine level by level (rhythmic or Hold
technique)
5. Reassess
cervical parallel stretch
103
after completing hyoid motion testing, what do you treat with (x3)
◦ Indirect myofascial release (iMFR)
◦ Direct myofascial release (dMFR)
◦ Balanced ligamentous tension (BLT)
◦ Direct myofascial release (dMFR)
◦ Balanced ligamentous tension (BLT)
104
1. Patient supine or seated
2. DOc explains to patient where the hyoid bone is and
what DOc will be doing
3. GENTLY grip each end of the body of the hyoid
bone
4. Motion test – laterally, superior/inferior
5. What's the position of ease?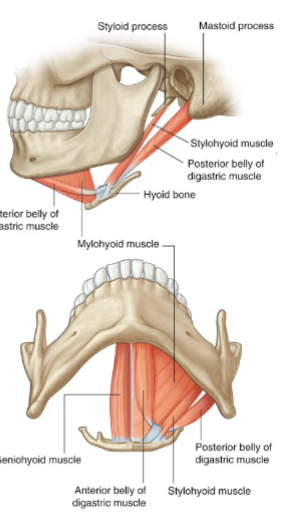
2. DOc explains to patient where the hyoid bone is and
what DOc will be doing
3. GENTLY grip each end of the body of the hyoid
bone
4. Motion test – laterally, superior/inferior
5. What's the position of ease?
hoid motion testing
105
1. Patient: Seated or supine.
2. DOc locates the triangle formed by the sternal and clavicular heads of
the left SCM. Move head – slight flexion, and SB toward side being
treated to relax tissues
3. DOc using the thumb, index finger, or middle finger, presses deep into
this triangle.
4. This pressure should elicit a mild degree of pain (to tolerance) and be
maintained (may use rotary motion at area) for at least a minute after
the hiccups cease to break the reflex arc
5. If the technique is unsuccessful on the left, it may be repeated on the
righ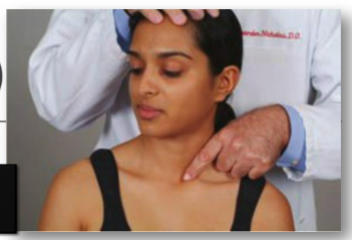
2. DOc locates the triangle formed by the sternal and clavicular heads of
the left SCM. Move head – slight flexion, and SB toward side being
treated to relax tissues
3. DOc using the thumb, index finger, or middle finger, presses deep into
this triangle.
4. This pressure should elicit a mild degree of pain (to tolerance) and be
maintained (may use rotary motion at area) for at least a minute after
the hiccups cease to break the reflex arc
5. If the technique is unsuccessful on the left, it may be repeated on the
righ
singultus (hiccups) refex oriented technique
106
Restrictive barrier is DISENGAGED by DOc
Initially, the joint or tissue is positioned AWAY from the barrier
TOWARD relative ease/freedom of motion by DOc
Initially, the joint or tissue is positioned AWAY from the barrier
TOWARD relative ease/freedom of motion by DOc
indirect
107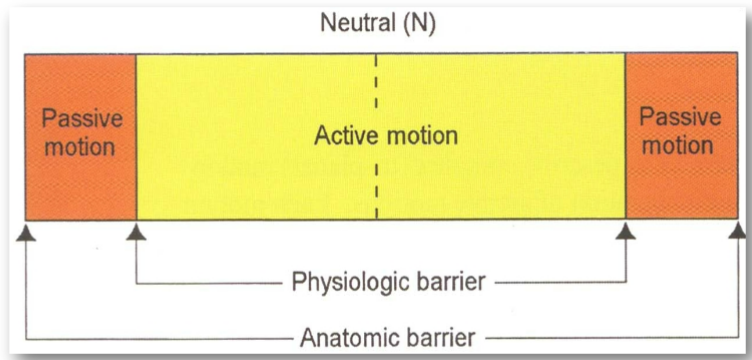
Image occlusion: name the hidden labels
108
Image occlusion: name the hidden labels
109
Image occlusion: name the hidden labels
110
Image occlusion: name the hidden labels
111
Image occlusion: name the hidden labels
112
Activating forces applied externally to the
patient
patient
extr
113
Activating forces that arise from
within the patient
within the patient
intrinsic
114
respiratory cooperation=respiratory assist
115
indirect myofascial release is used to treat somatic dysfunction involving (x3)
connective tissue, ligaments, tendons
116
who developed FPR
stanley schiowitz
117
who developed counterstrain
lawrence jones
118
Pt supine (nothing in their mouth, & proper exposure)
DOc is seated or standing at head of table
Neutralize by FLATTEN the axial curve at the level of the OA
Consider “tripod” hold to flatten c lordosis
Must MONITOR at the level treating (deep sulcus)
Gently COMPRESS longitudinally
Until you feel tissue soften at that segment
Move to the position of EASE (in all allowable planes)
i.e. into the diagnosis
HOLD for 5 full seconds
Gently/passively return to neutral
REASSESS (same as Dx)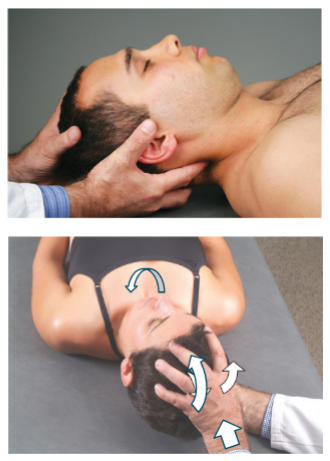
DOc is seated or standing at head of table
Neutralize by FLATTEN the axial curve at the level of the OA
Consider “tripod” hold to flatten c lordosis
Must MONITOR at the level treating (deep sulcus)
Gently COMPRESS longitudinally
Until you feel tissue soften at that segment
Move to the position of EASE (in all allowable planes)
i.e. into the diagnosis
HOLD for 5 full seconds
Gently/passively return to neutral
REASSESS (same as Dx)
FPR OA
119
AA is ALWAYS treated in NEUTRAL (not flexed)
Pt supine (nothing in their mouth, & proper exposure)
DOc is seated or standing at head of table
Neutralize by FLATTEN the axial curve at the level of the
AA
Consider “tripod” hold to flatten c lordosis
Must MONITOR at the level treating at TP of C1
Only treat AA in neutral (never flexed)
Gently COMPRESS longitudinally
Until you feel tissue soften at that segment
Move to the position of EASE (rotation only)
HOLD for 5 full seconds
Gently/passively return to neutral
REASSESS (flexed – same as Dx)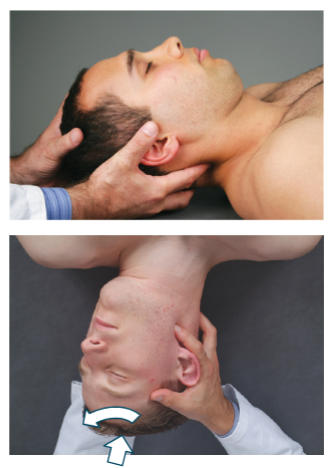
Pt supine (nothing in their mouth, & proper exposure)
DOc is seated or standing at head of table
Neutralize by FLATTEN the axial curve at the level of the
AA
Consider “tripod” hold to flatten c lordosis
Must MONITOR at the level treating at TP of C1
Only treat AA in neutral (never flexed)
Gently COMPRESS longitudinally
Until you feel tissue soften at that segment
Move to the position of EASE (rotation only)
HOLD for 5 full seconds
Gently/passively return to neutral
REASSESS (flexed – same as Dx)
FPR AA
120
Pt supine (nothing in their mouth, & proper exposure)
DOc is seated or standing at head of table
Neutralize by FLATTEN the axial curve at the one level you
are treating
Consider “tripod” hold to flatten c lordosis
Must MONITOR at the level treating
Gently COMPRESS longitudinally
Until you feel tissue soften at that segment
Move to the position of EASE (in all allowable planes)
HOLD for 5 full seconds
Gently/passively return to neutral
REASSESS (same as Dx)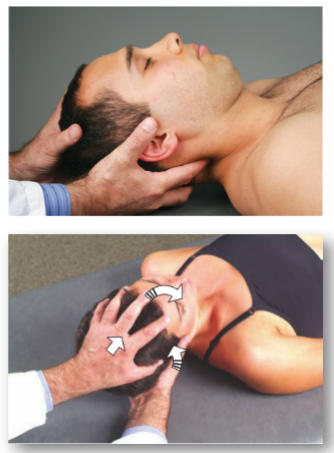
DOc is seated or standing at head of table
Neutralize by FLATTEN the axial curve at the one level you
are treating
Consider “tripod” hold to flatten c lordosis
Must MONITOR at the level treating
Gently COMPRESS longitudinally
Until you feel tissue soften at that segment
Move to the position of EASE (in all allowable planes)
HOLD for 5 full seconds
Gently/passively return to neutral
REASSESS (same as Dx)
FPR, C2-7
121
Position:
Patient supine. Patient’s
shoulder flexed to approx.
45o, abducted approx. 45o,
and then externally
rotated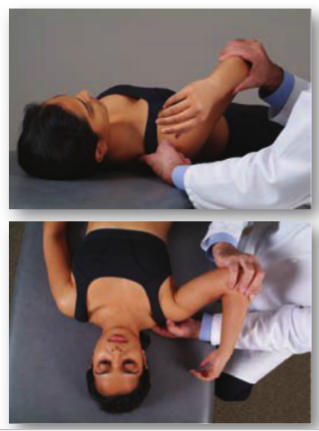
Patient supine. Patient’s
shoulder flexed to approx.
45o, abducted approx. 45o,
and then externally
rotated
counterstrain: supraspinatus
122
counterstrain point for?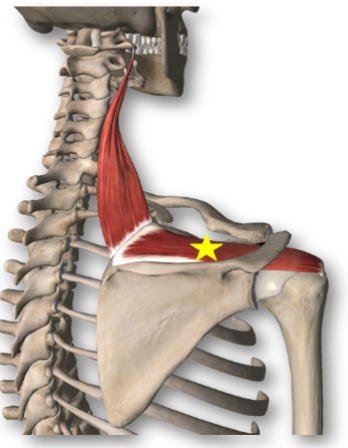
supraspinatus
123
Position:
Patient prone. Patient’s ipsilateral leg is placed in
hip ABDuction to approx. 45o, hip flexion to approx.
60-90o, knee flexion to approx. 90o, then hip
external rotation.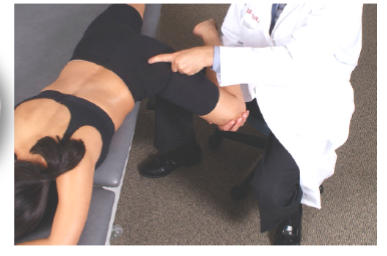
Patient prone. Patient’s ipsilateral leg is placed in
hip ABDuction to approx. 45o, hip flexion to approx.
60-90o, knee flexion to approx. 90o, then hip
external rotation.
counterstrain: piriformis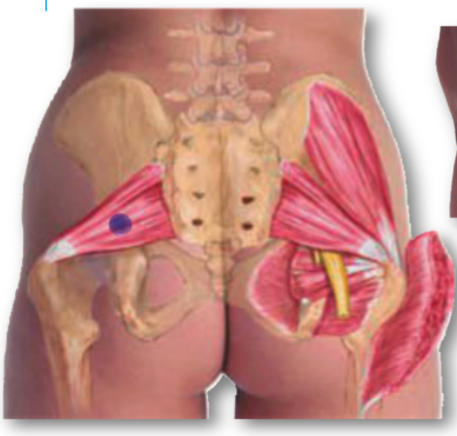
124
what is this the counterstrain point for?
piriformis
125
Position:
Patient supine. Patient’s ipsilateral elbow is fully extended and
forearm place in supination with minimal valgus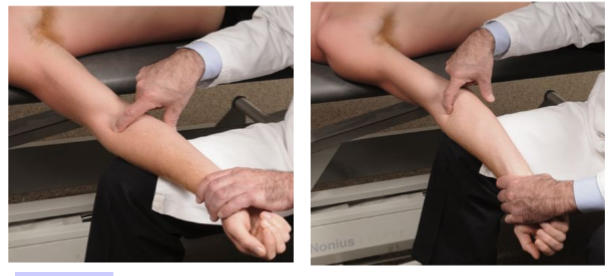
Patient supine. Patient’s ipsilateral elbow is fully extended and
forearm place in supination with minimal valgus
counterstrain supinator (@ lateral radial head)
126
what is this the counterstrain point for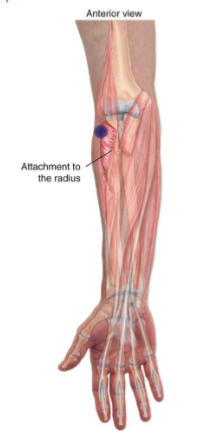
supinator at lateral radial head
127
the still technique starts _______ and finishes ______-
indirect; direct
128
Patient Supine
DO stands head of table
DO control patient’s head, monitor OA/C2 junction or suboccipital junction
Neutral spine (not flexed like diagnosis), Patient’s head Rotates indirect (ease of motion – diagnosis) then Compress (axial to the level (< 5lbs)) Rotates to barrier return to neutral.
Reassess
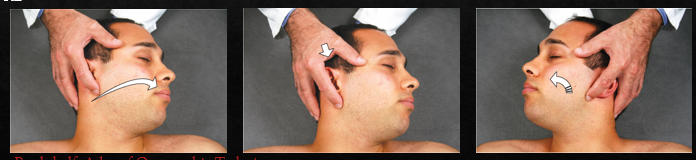
DO stands head of table
DO control patient’s head, monitor OA/C2 junction or suboccipital junction
Neutral spine (not flexed like diagnosis), Patient’s head Rotates indirect (ease of motion – diagnosis) then Compress (axial to the level (< 5lbs)) Rotates to barrier return to neutral.
Reassess
AA Still technique
129
Patient Supine
DO head of table
DO control patient’s head, monitor OA or C2-7 level
Neutral spine, Patient’s head Rotates indirect (ease of motion – diagnosis, ALL planes) then Compress (axial to the level (< 5lbs)) Rotates to barrier (ALL planes) return to neutral.
Reassess
Remember – Diagnosis (OA F/E/N Rx Sy, and C2-7 F/E/N Rx Sx)

DO head of table
DO control patient’s head, monitor OA or C2-7 level
Neutral spine, Patient’s head Rotates indirect (ease of motion – diagnosis, ALL planes) then Compress (axial to the level (< 5lbs)) Rotates to barrier (ALL planes) return to neutral.
Reassess
Remember – Diagnosis (OA F/E/N Rx Sy, and C2-7 F/E/N Rx Sx)
OA and C2-7 Still Technique
130
Patient Seated
DO stands behind
DO one hand control patient’s head & other hand monitor at diagnosis (T1-4)
Neutral spine, Patient’s head Rotates indirect (ease of motion – diagnosis, ALL planes) until motion at the Dx (T1-4) then Compress (axial/vertical to the level (< 5lbs)) Rotates to barrier (ALL planes) Return to neutral.
Reassess
Remember – Diagnosis (T1-4 made in seated position & Follows Fryette’s Principles)

DO stands behind
DO one hand control patient’s head & other hand monitor at diagnosis (T1-4)
Neutral spine, Patient’s head Rotates indirect (ease of motion – diagnosis, ALL planes) until motion at the Dx (T1-4) then Compress (axial/vertical to the level (< 5lbs)) Rotates to barrier (ALL planes) Return to neutral.
Reassess
Remember – Diagnosis (T1-4 made in seated position & Follows Fryette’s Principles)
T1-4 still technique
131
Monitor the dysfunction
DOc passively engage the Restrictive barrier (all planes of motion)
Isometric contraction for 3-5 sec
Patient relaxes for 2 sec (2 sec pause)
DOc passively engage the new barrier (all planes)
Repeat steps 3–5 until you get them to the Physiologic barrier (approximately 3-5 times)
Return to neutral
Reassess!
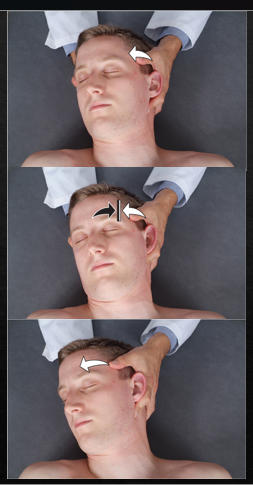
DOc passively engage the Restrictive barrier (all planes of motion)
Isometric contraction for 3-5 sec
Patient relaxes for 2 sec (2 sec pause)
DOc passively engage the new barrier (all planes)
Repeat steps 3–5 until you get them to the Physiologic barrier (approximately 3-5 times)
Return to neutral
Reassess!
Musvle energy (PICR) at AA
132
Patient Supine
DO head of table
DO control patient’s head, monitor OA
Patient’s head into all barriers (minimal motion) sidebending and rotation and F/E/N
Isometric contraction 3-5 sec
Patient relaxes, (DOc takes 2 sec pause) engage new barrier in all planes
Repeat isometric ctx, relax/2 sec pause/new barrier for 3-5 times
Return to neutral.
Reassess
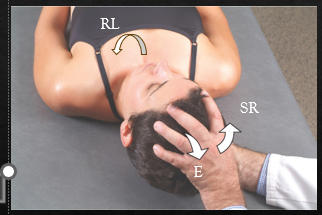
DO head of table
DO control patient’s head, monitor OA
Patient’s head into all barriers (minimal motion) sidebending and rotation and F/E/N
Isometric contraction 3-5 sec
Patient relaxes, (DOc takes 2 sec pause) engage new barrier in all planes
Repeat isometric ctx, relax/2 sec pause/new barrier for 3-5 times
Return to neutral.
Reassess
OA-ME tecnique
133
Patient Supine
DO stands head of table
DO control patient’s head, monitor OA/C2 junction or suboccipital junction
Neutral spine (not flexed like diagnosis), Patient’s head Rotates direct (into barrier) Isometric contraction 3-5 sec Patient relaxes, 2 sec pause engage new barrier Repeat isometric ctx, relax/2 sec pause/new barrier 3-5 times return to neutral.
Reassess
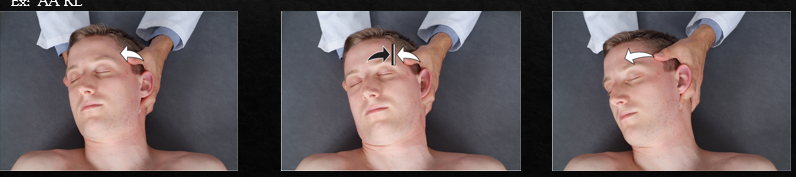
DO stands head of table
DO control patient’s head, monitor OA/C2 junction or suboccipital junction
Neutral spine (not flexed like diagnosis), Patient’s head Rotates direct (into barrier) Isometric contraction 3-5 sec Patient relaxes, 2 sec pause engage new barrier Repeat isometric ctx, relax/2 sec pause/new barrier 3-5 times return to neutral.
Reassess
AA-ME Tecnique
134
Patient Supine
DO head of table
DO control patient’s head, monitor C2-7 level (or OA if treating OA)
Neutral spine (not flexed like diagnosis), Patient’s head Rotates direct (into barrier - ALL planes) Isometric contraction 3-5 sec Patient relaxes, 2 sec pause engage new barrier (ALL planes) Repeat isometric ctx, relax/2 sec pause/new barrier 3-5 times return to neutral.
Reassess
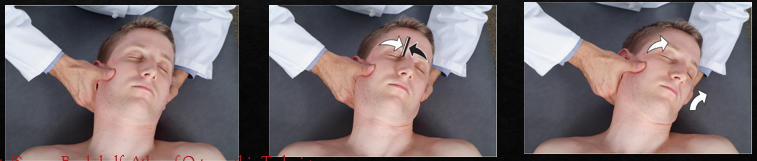
DO head of table
DO control patient’s head, monitor C2-7 level (or OA if treating OA)
Neutral spine (not flexed like diagnosis), Patient’s head Rotates direct (into barrier - ALL planes) Isometric contraction 3-5 sec Patient relaxes, 2 sec pause engage new barrier (ALL planes) Repeat isometric ctx, relax/2 sec pause/new barrier 3-5 times return to neutral.
Reassess
C2-7 ME technique
135
what does this show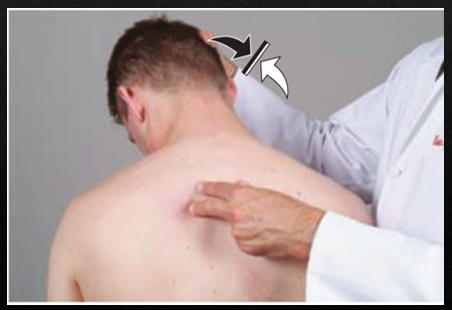
muscle energy PICR (T1-4)
136
Cause = hypertonic piriformis
Patient: supine
DOc – Opposite side as dysfunction (contralateral side)
Flex pt hip and knee, & ankle crosses opposite knee
Monitors ilium – side of dysfunction (ipsilateral side)
DOc pulls knee towards - IR hip
Pt attempts to ER hip– Isometric contraction
Hold 3-5 sec, relax, 2 sec pause, go to new barrier,
Repeat 3-5 times
Return to neutral
Reassess
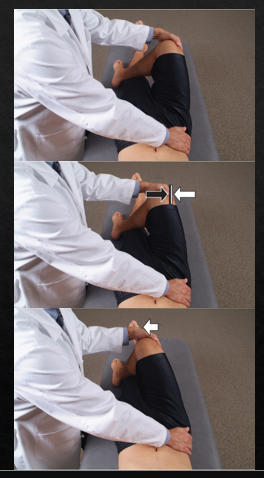
Patient: supine
DOc – Opposite side as dysfunction (contralateral side)
Flex pt hip and knee, & ankle crosses opposite knee
Monitors ilium – side of dysfunction (ipsilateral side)
DOc pulls knee towards - IR hip
Pt attempts to ER hip– Isometric contraction
Hold 3-5 sec, relax, 2 sec pause, go to new barrier,
Repeat 3-5 times
Return to neutral
Reassess
Piriformis-MET (PICR)
137
Cause = hypertonic Psoas
Patient: prone
DOc – Same side as dysfunction (ipsilateral side)
Flex pt knee,
Monitors ilium – side of dysfunction (ipsilateral side)
DOc pulls knee towards ceiling - extension hip
Pt attempts to flex hip – toward table– Isometric contraction
Hold 3-5 sec, relax, 2 sec pause, go to new barrier,
Repeat 3-5 times
Reassess
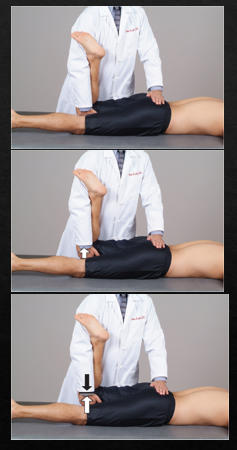
Patient: prone
DOc – Same side as dysfunction (ipsilateral side)
Flex pt knee,
Monitors ilium – side of dysfunction (ipsilateral side)
DOc pulls knee towards ceiling - extension hip
Pt attempts to flex hip – toward table– Isometric contraction
Hold 3-5 sec, relax, 2 sec pause, go to new barrier,
Repeat 3-5 times
Reassess
Psoas MET (PICR)
138
The distance over which the force is applied
amplitude
139
The speed with which the force is applied.
velocity
140
The force that results in the therapeutic effect of the technique
final activating force
141
types of direct techniques
Myofascial release (MFR)
Articulatory treatment (ART)
e.g., Springing
Still
Starts INdirect and ends up Direct
Muscle Energy (ME)
High Velocity Low Amplitude (HVLA
Articulatory treatment (ART)
e.g., Springing
Still
Starts INdirect and ends up Direct
Muscle Energy (ME)
High Velocity Low Amplitude (HVLA
142
what is the post treatment reacyion to direct treatmet
General soreness through the following 24 to 48 hours
143
what are directions given to a patient post direct treatment procedures
Patient to increase fluids (non-caffeine/non-EtOH)
May use ice packs over the sore areas for 15 to 20 minutes every 3 hours as needed.
May use ice packs over the sore areas for 15 to 20 minutes every 3 hours as needed.
144
myofacical relese, velocity and amplitide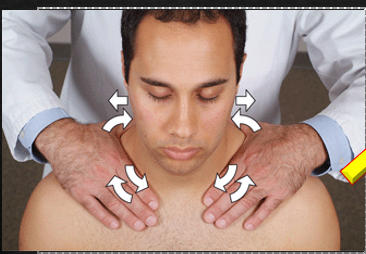
low
145
goal of myofacicval release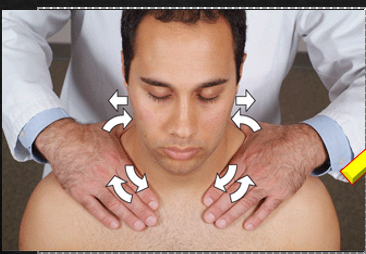
relaxation of soft tissue tension
146
goal of articulatory treatment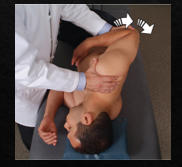
increased articular ROM
147
velocity and amplitude articulatory treatment (ART)
low velocity, mod-high aplitide
148
A low velocity / mod. amplitude
The restrictive barrier is engaged repeatedly
Therapeutic goal: increased articular ROM
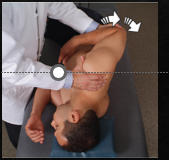
The restrictive barrier is engaged repeatedly
Therapeutic goal: increased articular ROM
springing (ART)
149
who digitized and referenced the still technique
Richard Van Buskirk
150
indivcations still technique
1. Articular somatic dysfunctions associated with intersegmental motion restriction
2. Myofascial somatic dysfunctions associated with muscle hypertonicity or fascial bind
2. Myofascial somatic dysfunctions associated with muscle hypertonicity or fascial bind
151
contraindications still technique
1. Severe loss of intersegmental motion in the area to be treated
Secondary to spondylosis, OA, or RA
2. Mod. to severe joint instability in the area to be treated
3. Acute strain/sprain in the area to be treated if the tissues may be further compromised by the motion introduced in the technique
Secondary to spondylosis, OA, or RA
2. Mod. to severe joint instability in the area to be treated
3. Acute strain/sprain in the area to be treated if the tissues may be further compromised by the motion introduced in the technique
152
Start in Neutral then place in Position of Ease (away from barrier) & Monitor
Choose the body part to use as a lever for articulation (neck, extremity, etc)
Apply a vectored force parallel to the lever
Compression (< 5lbs) or Distraction
Position into the barrier while maintaining the compression.
The lever is used to move the dysfunctional segment through its barrier and then back to neutral while the parallel force is maintained
Return to neutral
Reassess
Choose the body part to use as a lever for articulation (neck, extremity, etc)
Apply a vectored force parallel to the lever
Compression (< 5lbs) or Distraction
Position into the barrier while maintaining the compression.
The lever is used to move the dysfunctional segment through its barrier and then back to neutral while the parallel force is maintained
Return to neutral
Reassess
still technique
153
who invented muscle energy
Fred L. Mitchell, Sr., DO
154
indications muscle energy
S.D. of myofascial origin, esp. reduce hypertonic muscles, lengthen shortened muscles, or stretch and improve elasticity in fibrotic muscles
S.D. of articular origin to mobilize restricted joints and improve the range of motion
S.D. of articular origin to mobilize restricted joints and improve the range of motion
155
contraindications to muscle energy technique
1. Mod. to severe joint instability 2. Infection, hematoma, or tear in muscle
3. Metastatic disease of bone or soft tissue
4. Acute reactive rheumatologic/ inflammatory conditions
3. Metastatic disease of bone or soft tissue
4. Acute reactive rheumatologic/ inflammatory conditions
156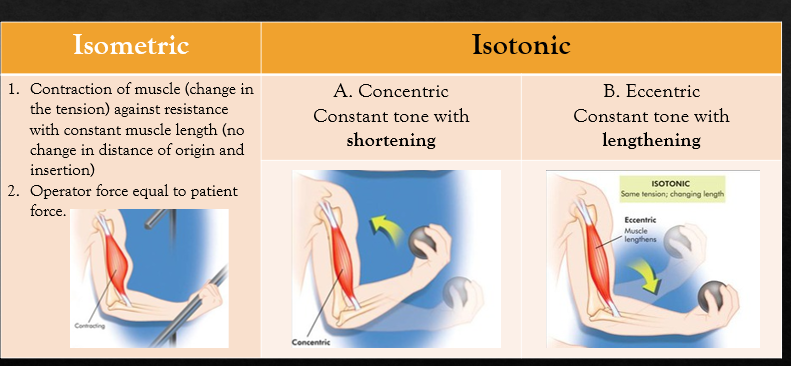
Image occlusion: name the hidden labels
157
Image occlusion: name the hidden labels
158
Type of eccentric
Contraction of a muscle against resistance while operator force causes muscle to lengthen.
Contraction of a muscle against resistance while operator force causes muscle to lengthen.
isolytic contraction
159
Type of concentric
Contraction against resistance in which the angular change of joint motion is at the same rate.
Contraction against resistance in which the angular change of joint motion is at the same rate.
isokinetic contraction
160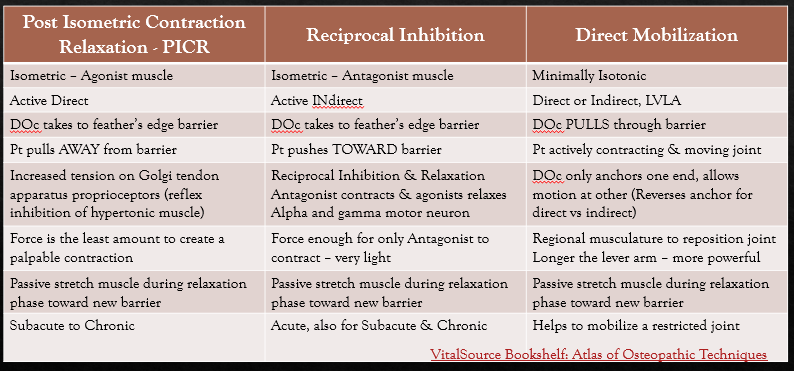
Image occlusion: name the hidden labels
161
Image occlusion: name the hidden labels
162
Image occlusion: name the hidden labels
163
Image occlusion: name the hidden labels
164
Image occlusion: name the hidden labels
165
Image occlusion: name the hidden labels
166
Image occlusion: name the hidden labels
167
Image occlusion: name the hidden labels
168
Image occlusion: name the hidden labels
169
inactivity increases with age with women being (greater/less) active then men
less
170
what is the recomended excercise for adults (wk/CDC)
aerobic 150min x5days and strengthening 2 days
171
components of exercse rx (FITT VP)
Frequency
Intensity
Time
Type
Volume
Progression
Intensity
Time
Type
Volume
Progression
172
best outcomes for exercise incorporate the following elemets (x4)
Individualized regumens, supervision, stretching, strengthening
173
Indications for exercise Rx
. TO DEVELOP A SENSE OF GOOD POSTURAL ALIGNMENT
2. TORELAX OR LENGTHEN CONTRACTED OR SHORTENED
MUSCULATURE
3. TOACHIEVE FLEXIBILITY OF JOINT MOTION WITHIN ITS NORMAL
RANGE OF MOTION
4. TOINCREASE MUSCLE STRENGTH AS NEEDED TO ATTAIN AND
MAINTAIN PROPER FUNCTION
.
2. TORELAX OR LENGTHEN CONTRACTED OR SHORTENED
MUSCULATURE
3. TOACHIEVE FLEXIBILITY OF JOINT MOTION WITHIN ITS NORMAL
RANGE OF MOTION
4. TOINCREASE MUSCLE STRENGTH AS NEEDED TO ATTAIN AND
MAINTAIN PROPER FUNCTION
.
174
how can reciprocal inhibition work for you/in your favor?
M
THE OPPOSITE SIDE
(A
.
• (S
OBILIZE A JOINT BY CONTRACTING MUSCLES ON ONE
SIDE OF THE JOINT
GONIST
)
AND RELAXING MUSCLES ON
TABILIZE A JOINT BY CO
CONTRACTION
)
THE OPPOSITE SIDE
(A
.
• (S
OBILIZE A JOINT BY CONTRACTING MUSCLES ON ONE
SIDE OF THE JOINT
GONIST
)
AND RELAXING MUSCLES ON
TABILIZE A JOINT BY CO
CONTRACTION
)
175
how can reciprocal inhibition work against you
injuring muscles at one side of the joint causes the muscles around it to become hypertonic to attempt to avoid further injury
-shuts down the antagonists
-shuts down the antagonists
176
normal sequence of motion of hip extension (x6)
1) hamstrings of gluteus maximus
3) contrilateral lumbars low
4) ipsilateral lumbars low
5) contralateral lumbars high
6) ipsilateral lubars high
3) contrilateral lumbars low
4) ipsilateral lumbars low
5) contralateral lumbars high
6) ipsilateral lubars high
177
how many exercises should you limit to in an exercise rx?
no more than 4
178
how odten should exercise rx be perforned (frequency of how often written on a script)
start daily tha move to 3x a wk
179
psoas hypertonic
-pelvis tilted posteriorly ten leg leaned forwared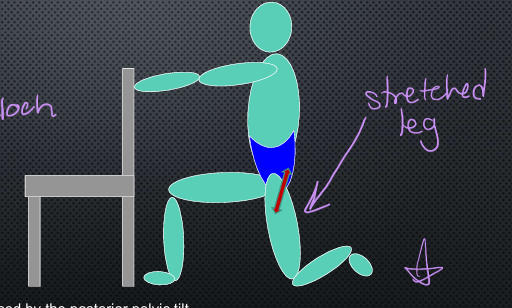
-pelvis tilted posteriorly ten leg leaned forwared
psoas stretch
180
lats stretched out
-lean backward into knees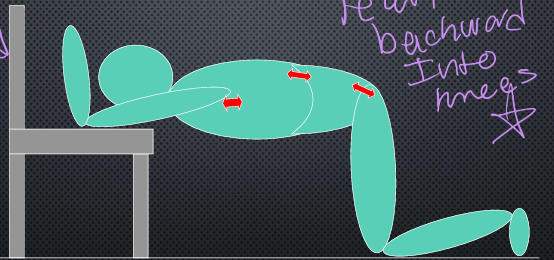
-lean backward into knees
prayer stretch
181
stretch caused by posterior pelvic tilt
-kep back streigh
-hold for 20sec
-let off for 5sec
-hold for another 20sec
-done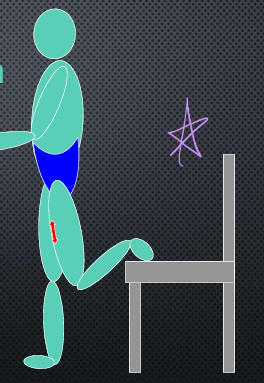
-kep back streigh
-hold for 20sec
-let off for 5sec
-hold for another 20sec
-done
rectus femoris stretch
182
keep the back streiaght and hip neutral with hip and knees tofether and heel to buttocks
-hold for 20sec
-let off for 5sec
-hold for 20 sec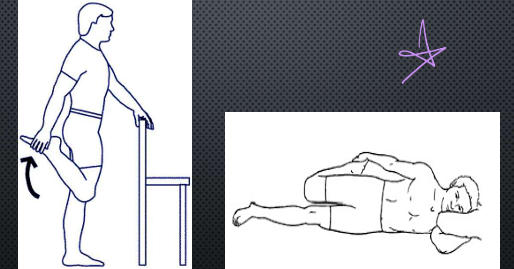
-hold for 20sec
-let off for 5sec
-hold for 20 sec
quadriceps stretch
183
-extensor sirface of antebrachium on table
-stretch is achieved as torso is pulled towards the heel
-keel the back streaigh
-hold for 20 seconds
-let off for 5
-hold for 20
-done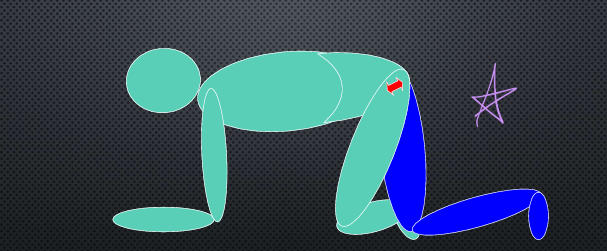
-stretch is achieved as torso is pulled towards the heel
-keel the back streaigh
-hold for 20 seconds
-let off for 5
-hold for 20
-done
piriformis stretch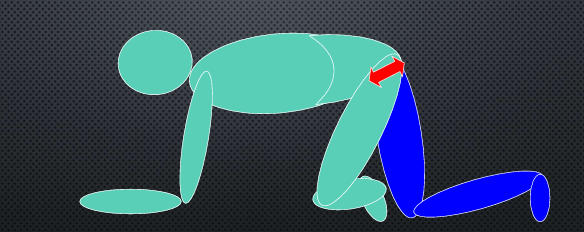
184
-keep back straight and pelvis and head down
-hold for 20sec
-let off for 5 sec
-hold for 20 more sec
-done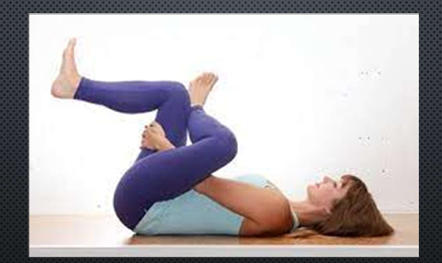
-hold for 20sec
-let off for 5 sec
-hold for 20 more sec
-done
piriformis stretch modified
185
Image occlusion: name the hidden labels
186
Image occlusion: name the hidden labels
187
Image occlusion: name the hidden labels
188
stages of spender ME/Springing in order
extension, flexion, circumduction w/compression, circumduction with traction, abduction, adduction with external rotation, internal rotation, distraction/stretching/enhanced fluid drainage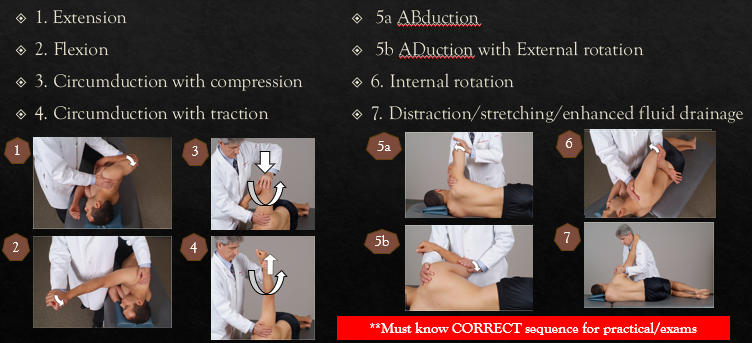
189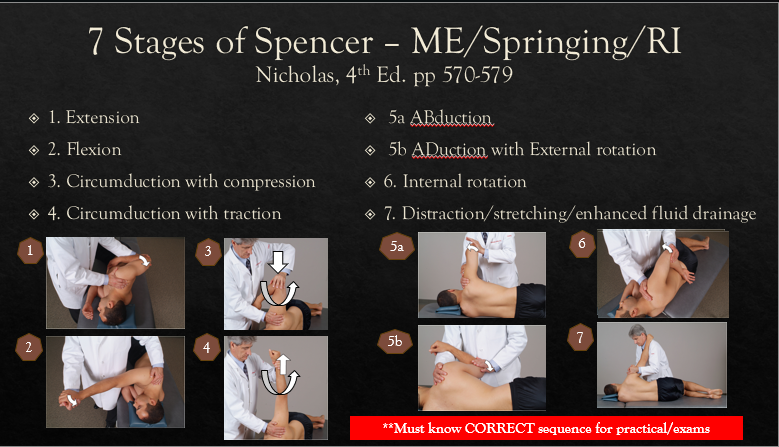
Image occlusion: name the hidden labels
190
Image occlusion: name the hidden labels
191
Image occlusion: name the hidden labels
192
Image occlusion: name the hidden labels
193
Image occlusion: name the hidden labels
194
Image occlusion: name the hidden labels
195
Image occlusion: name the hidden labels
196
Image occlusion: name the hidden labels
197
Image occlusion: name the hidden labels
198
Image occlusion: name the hidden labels
199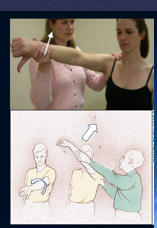
neer test
200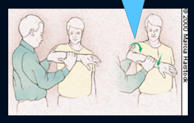
hawkin's test
201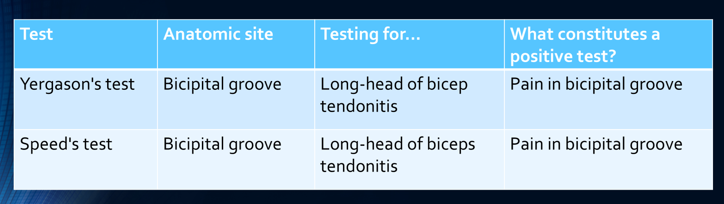
Image occlusion: name the hidden labels
202
Image occlusion: name the hidden labels
203
test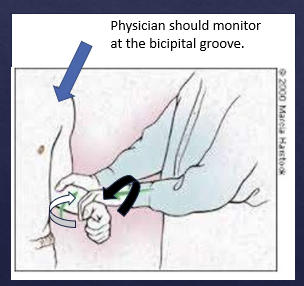
yergson test
204
test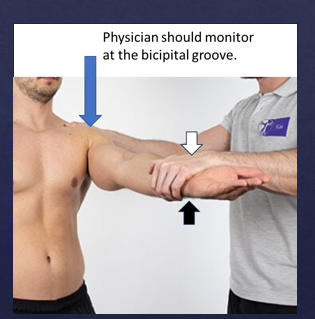
speed's tet
205
Tests for Long head of biceps tendonitis
Patient is sitting or standing
Shoulder flexed to 90°
Elbow fully extended (but not hyperextended)
Forearm supinated (palm up)
Examiner places one hand on the patient's forearm and the other hand over the bicipital groove
Examiner resists the patient's attempt to actively flex the humerus (not biceps/elbow)
POSITIVE = In the setting of tendonitis, this will produce pain in the bicipital groove
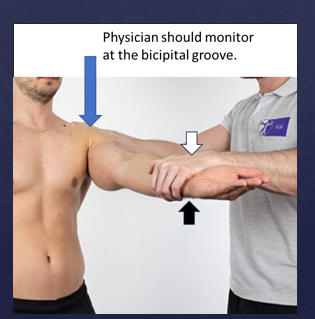
Patient is sitting or standing
Shoulder flexed to 90°
Elbow fully extended (but not hyperextended)
Forearm supinated (palm up)
Examiner places one hand on the patient's forearm and the other hand over the bicipital groove
Examiner resists the patient's attempt to actively flex the humerus (not biceps/elbow)
POSITIVE = In the setting of tendonitis, this will produce pain in the bicipital groove
speed's tet
206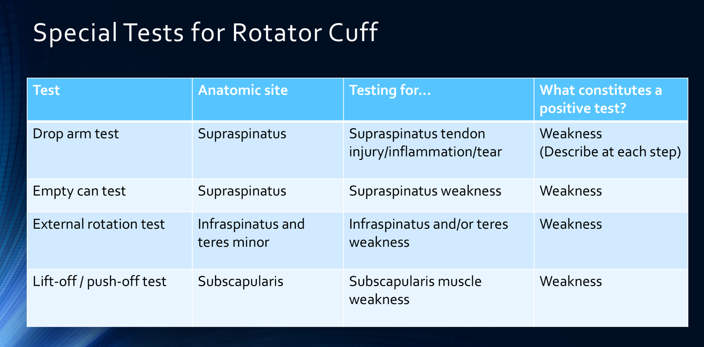
Image occlusion: name the hidden labels
207
Image occlusion: name the hidden labels
208
Image occlusion: name the hidden labels
209
Image occlusion: name the hidden labels
210
test?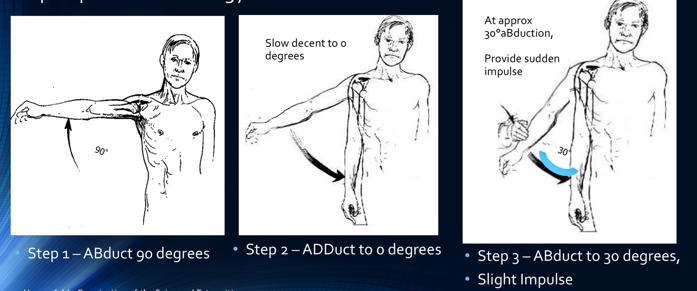
drop arm
211
Test of supraspinatus strength
ABduct the arms to 90 degrees
Flex shoulder to 30 degrees
Alternative – Flex to 90d, and ABD to 30d
Internally rotate the arms with the thumbs pointing down, as if emptying a can
Ask patient to resist downward pressure on the arms
Apply pressure on one arm at a time and note any weakness
POSITIVE = Weakness = Suspect supraspinatus injury
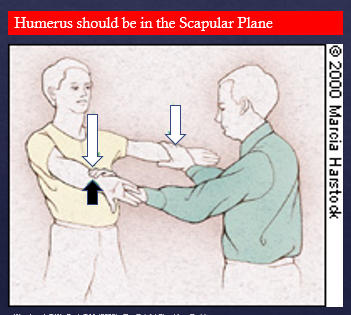
ABduct the arms to 90 degrees
Flex shoulder to 30 degrees
Alternative – Flex to 90d, and ABD to 30d
Internally rotate the arms with the thumbs pointing down, as if emptying a can
Ask patient to resist downward pressure on the arms
Apply pressure on one arm at a time and note any weakness
POSITIVE = Weakness = Suspect supraspinatus injury
empty can test
212
Test infraspinatus and teres minor
Patient
Have the patient slightly abduct (20-30 degrees) their shoulders
Keep both elbows flexed to 90 degrees.
Examiner places hands on the outside of patient’s distal forearms. (lateral)
Examiner directs patient to push their wrists outward (externally rotate) against the examiner’s resistance.
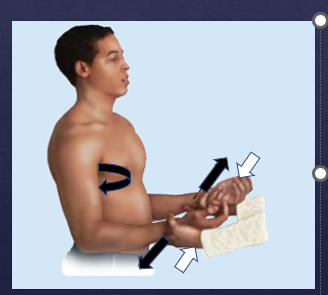
Patient
Have the patient slightly abduct (20-30 degrees) their shoulders
Keep both elbows flexed to 90 degrees.
Examiner places hands on the outside of patient’s distal forearms. (lateral)
Examiner directs patient to push their wrists outward (externally rotate) against the examiner’s resistance.
external rotation of shoulder
213
Evaluates Subscapularis
Patient
Patient internally rotates shoulder
Place the back (dorsum) of their hand against the small of the back (mid-lumbar region)
Examiner instructs patient to lift off their back – extension of shoulder (may maintain or increase IR shoulder)
Examiner resists patient's attempt to force their arm away from their back
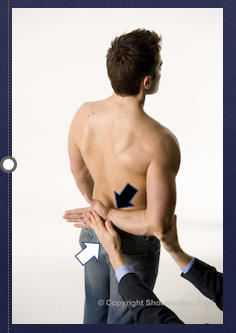
Patient
Patient internally rotates shoulder
Place the back (dorsum) of their hand against the small of the back (mid-lumbar region)
Examiner instructs patient to lift off their back – extension of shoulder (may maintain or increase IR shoulder)
Examiner resists patient's attempt to force their arm away from their back
lift off tet
214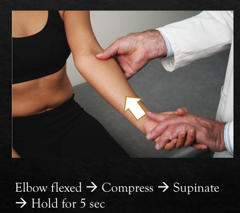
FPR anterior radial head
215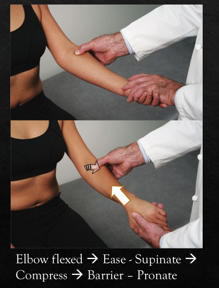
still anterior radial head
216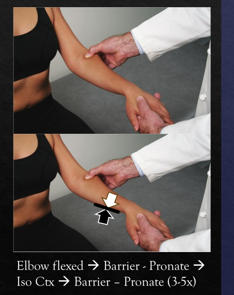
me anterior radial head
217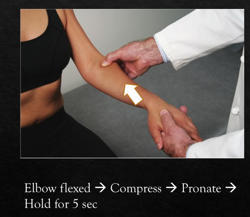
FPR posterior radial heaf
218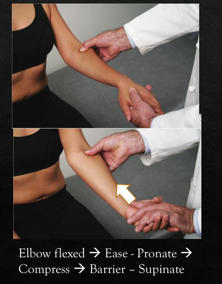
still posterior radial head
219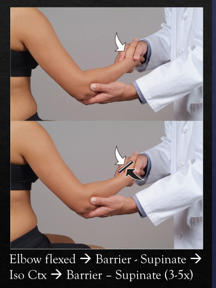
ME posterior radial head
220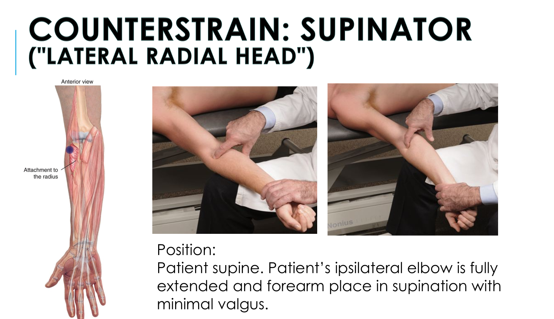
Image occlusion: name the hidden labels
221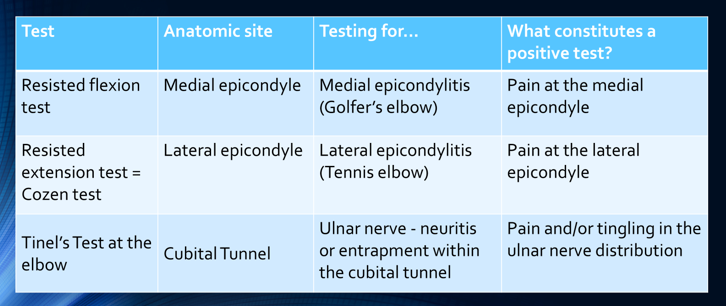
Image occlusion: name the hidden labels
222
Image occlusion: name the hidden labels
223
Image occlusion: name the hidden labels
224
Medial Epicondyle
Patient
Asked to actively flex wrist, while forearm in pronation
Examiner
Stabilize the elbow,
Monitor medial epicondyle
Resist patient’s active flexion of wrist
POSITIVE = pain or symptoms at medial epicondyle
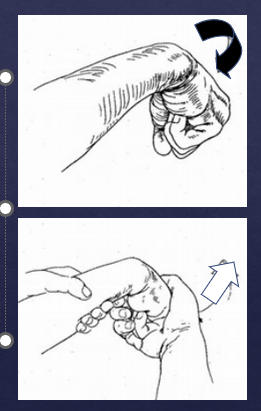
Patient
Asked to actively flex wrist, while forearm in pronation
Examiner
Stabilize the elbow,
Monitor medial epicondyle
Resist patient’s active flexion of wrist
POSITIVE = pain or symptoms at medial epicondyle
resisted fleion test
225
Lateral Epicondyle
Patient
Asked to actively extend wrist, while forearm in pronation, wrist w/slight radial deviation
Examiner
Stabilize the elbow
Monitor lateral epicondyle
Resist patient’s active extension of wrist
POSITIVE = pain or symptoms at lateral epicondyle
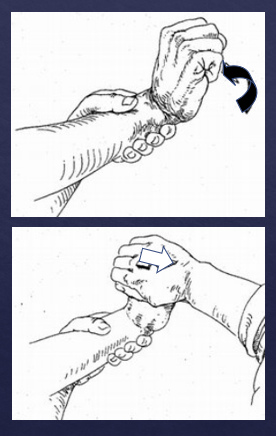
Patient
Asked to actively extend wrist, while forearm in pronation, wrist w/slight radial deviation
Examiner
Stabilize the elbow
Monitor lateral epicondyle
Resist patient’s active extension of wrist
POSITIVE = pain or symptoms at lateral epicondyle
resisted extension tet
226
Elbow
Cubital Tunnel
Ulnar Nerve
Examiner – locate medial epicondyle and olecranon
Tap over ulnar nerve b/w the 2 landmarks
POSITIVE = pain, symptoms in ulnar n distribution
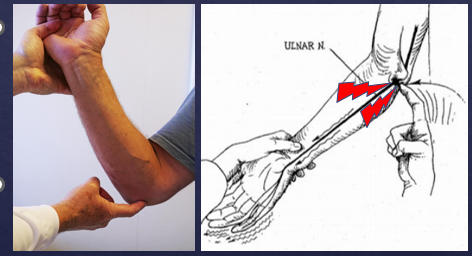
Cubital Tunnel
Ulnar Nerve
Examiner – locate medial epicondyle and olecranon
Tap over ulnar nerve b/w the 2 landmarks
POSITIVE = pain, symptoms in ulnar n distribution
tinel sign at elbow
227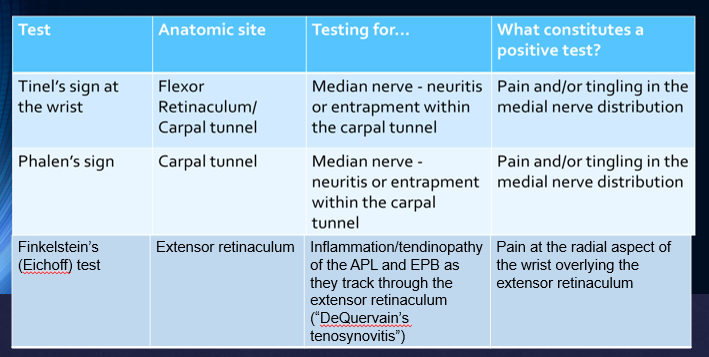
Image occlusion: name the hidden labels
228
Image occlusion: name the hidden labels
229
Image occlusion: name the hidden labels
230
Examiner
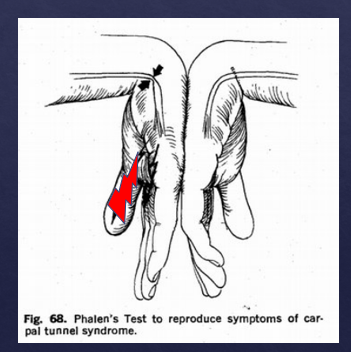
Instruct patient to flex at the wrists
> 90 degrees
Hold
Symptoms
Carpal Tunnel
Median Nerve
POSITIVE = pain, symptoms in median n distribution
Instruct patient to flex at the wrists
> 90 degrees
Hold
Symptoms
Carpal Tunnel
Median Nerve
POSITIVE = pain, symptoms in median n distribution
phalen's sign
231
Wrist
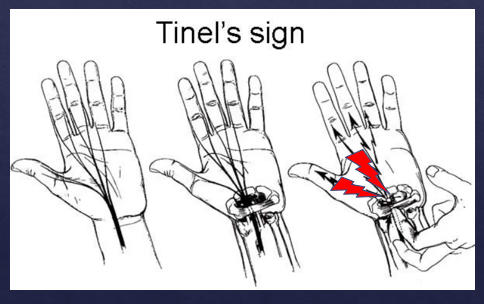
Carpal Tunnel
Median Nerve
Examiner
Tap over the retinaculum at the median nerve
Must be over medial nerve in canal – distal to palmer crease
POSITIVE = pain, symptoms in median n distribution
Carpal Tunnel
Median Nerve
Examiner
Tap over the retinaculum at the median nerve
Must be over medial nerve in canal – distal to palmer crease
POSITIVE = pain, symptoms in median n distribution
tinel sign at wrist
232
De Quervain’s tenosynovitis
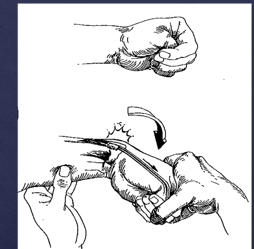
Examiner
Instruct patient to actively make first with thumb inside fingers
Wrist neutral position
Stabilize forearm/wrist and passively ulnar deviate the wrist
POSITIVE = pain at the radial side of the wrist at the tendons
Examiner
Instruct patient to actively make first with thumb inside fingers
Wrist neutral position
Stabilize forearm/wrist and passively ulnar deviate the wrist
POSITIVE = pain at the radial side of the wrist at the tendons
Finkelstein tet
233
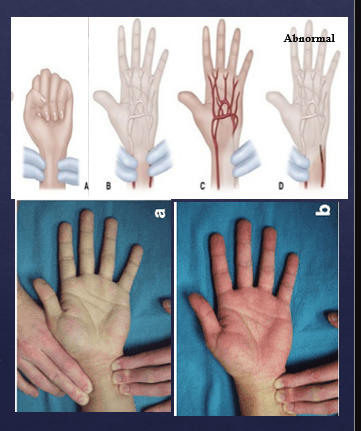
Collateral Circulation of the Hand
Radial a
Ulnar a
Used – prior to any arterial sampling/line, hand surgery
Examiner
Ask the patient to make a fist (A)
Occlude both arteries
Ask patient to open fist (B)
Remove occlusion from one artery and see if circulation returns to the hand while other artery is still occluded (C)
Release both arteries
Repeat and open the opposite artery the second time
Radial a
Ulnar a
Used – prior to any arterial sampling/line, hand surgery
Examiner
Ask the patient to make a fist (A)
Occlude both arteries
Ask patient to open fist (B)
Remove occlusion from one artery and see if circulation returns to the hand while other artery is still occluded (C)
Release both arteries
Repeat and open the opposite artery the second time
allen tet
234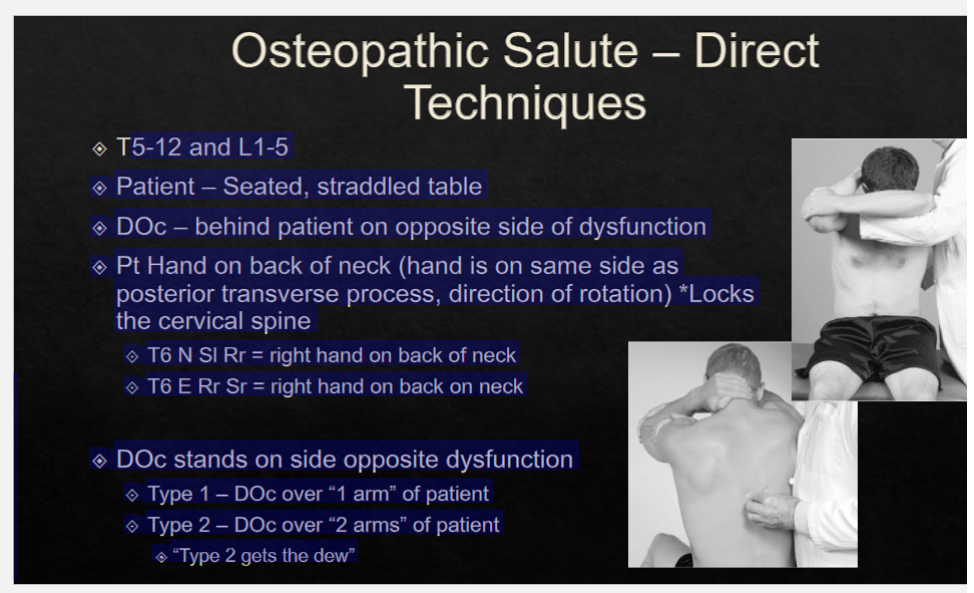
Image occlusion: name the hidden labels
235
osteopathic salute: of a patient has type 1 dysfunction how many arms over patient
1